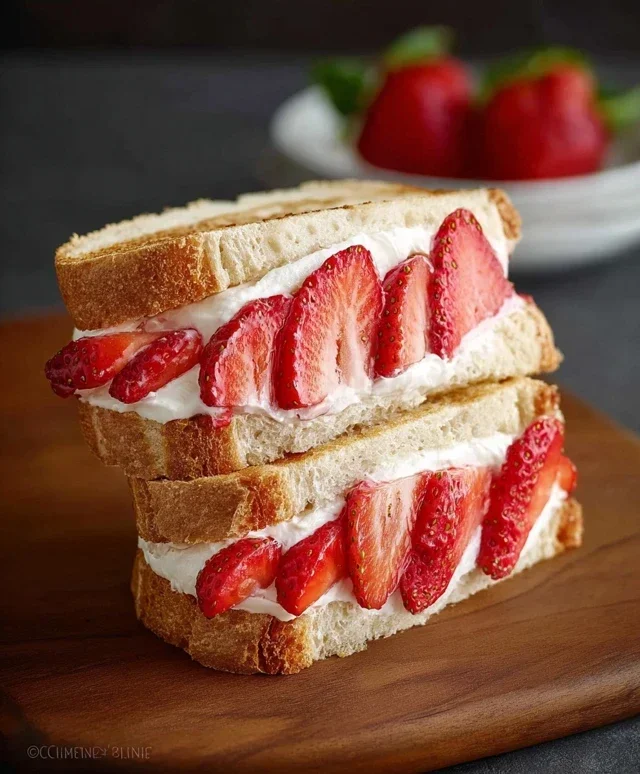
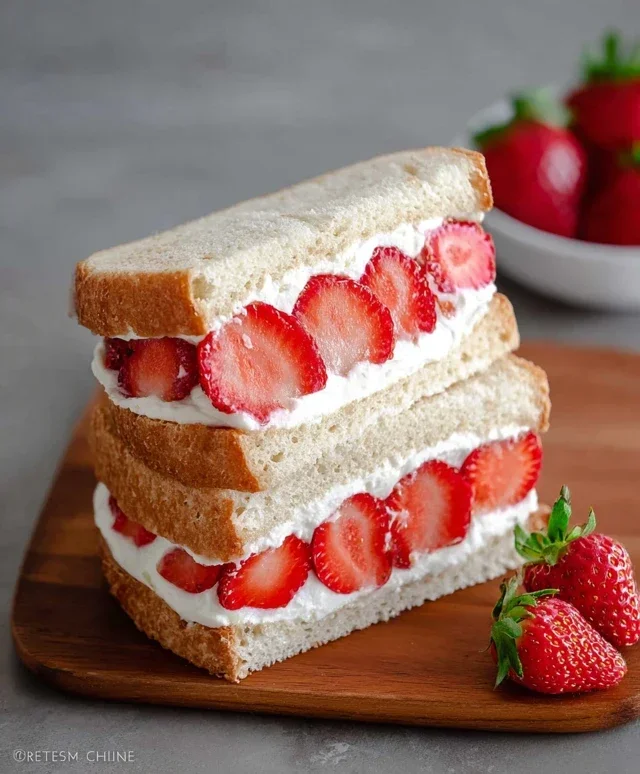
Easy Strawberry Sando Quick Recipe
4-ingredient Strawberry Sando creations are a testament to the magic that can happen with just a few simple ingredients. I’ve always been drawn to recipes that prove deliciousness doesn’t require a complex pantry or hours in the kitchen. This particular 4-ingredient Strawberry Sando hits all the right notes: it’s incredibly easy to make, utterly delightful to eat, and visually stunning. What’s not to love about the vibrant pink of fresh strawberries peeking out from pillowy soft bread, all bound together by a luscious, sweet filling? It’s a dessert that evokes childhood nostalgia and sophisticated elegance all at once. The simplicity of this 4-ingredient Strawberry Sando is precisely what makes it so special; it allows the pure, unadulterated flavors of the strawberries and cream to shine through, creating a perfect balance of sweet and slightly tart that’s simply irresistible. Get ready to fall in love with this effortless treat!
The Effortless Delight: 4-Ingredient Strawberry Sando
Sometimes, the simplest things bring the most joy. Today, we’re diving into a recipe that perfectly embodies this philosophy: the 4-Ingredient Strawberry Sando. This Japanese-inspired treat is unbelievably easy to make, requires minimal ingredients, and delivers a burst of sweet, creamy, and fruity goodness in every bite. It’s the perfect indulgence for a quick afternoon snack, a delightful dessert, or even a charming addition to a brunch spread. Forget complicated techniques and lengthy preparation; this recipe is all about pure, unadulterated deliciousness.
Let’s talk about the magic of this sando. It’s a delicate balance of soft, pillowy bread, a cloud of sweet whipped cream, and the vibrant freshness of strawberries. The beauty lies in its simplicity. Each component plays a vital role, coming together to create a symphony of textures and flavors. You’ll be amazed at how something so straightforward can taste so incredibly decadent. Plus, with only four ingredients, it’s a recipe that’s accessible to everyone, regardless of your culinary experience. So, gather your few, precious ingredients, and let’s create something truly special together.
Ingredients:
Crafting Your Strawberry Sando: A Step-by-Step Guide
Now that you have your simple yet potent ingredients ready, let’s embark on the journey of assembling your strawberry sando. This process is more about gentle assembly than intense cooking, making it a relaxing and rewarding experience.
1. Prepare the Strawberries: The Fruity Foundation
Our first step is to get our star fruit, the strawberries, ready. You’ll want to wash your 5 strawberries thoroughly under cool running water and gently pat them dry with a clean kitchen towel. The dryness is important; we don’t want excess moisture diluting the flavors or making our bread soggy. Once dried, remove the green tops. You can do this with a small paring knife or even by pinching them off if they’re loose. Next, we’re going to slice these beautiful berries. For the best texture and visual appeal in your sando, aim for relatively thin slices, about 1/8 to 1/4 inch thick. Try to keep the slices as uniform as possible so that they distribute evenly throughout the sandwich. You’ll want to have enough slices to generously cover one slice of bread. If your strawberries are particularly large, you might only need 3 or 4. Conversely, if they are smaller, you might use all 5. Taste is key here! Once sliced, gently place these strawberry slices into a small bowl.
2. Sweeten the Strawberries: A Touch of Elegance
Now, we’ll add a touch of sweetness to our strawberries, which not only enhances their natural flavor but also helps to draw out some of their juices, creating a delightful, subtly syrupy layer within the sando. To the bowl containing your sliced strawberries, add the 1 tablespoon of white granulated sugar. Using a spoon, gently toss the strawberries with the sugar until they are evenly coated. You’ll notice that after a few minutes, the sugar will start to dissolve, and a little bit of strawberry juice will begin extract to form at the bottom of the bowl. This is exactly what we want! This sweet, slightly saucy coating will make the strawberries even more irresistible. Let them sit in this sugary embrace for about 5 to 10 minutes while you prepare the cream. This resting period allows the flavors to meld beautifully.
3. Whip the Cream: The Cloud of Sweetness
This is where we create the airy, luscious element of our sando. Take your chilled 1/2 cup of whipping cream (or heavy cream). It’s crucial that the cream is cold for it to whip properly and achieve that beautiful, fluffy texture. You can use a hand mixer or a whisk for this. If using a hand mixer, start on a low speed and gradually increase as the cream begin extracts to thicken. If you’re going the manual route with a whisk, be prepared for a bit of arm work – but the satisfaction is immense! Continue whipping the cream until it forms soft peaks. This means that when you lift the whisk or beaters out of the cream, the cream holds its shape briefly before gently slumping over. We don’t want stiff peaks, as that can make the sando too dense. Just a lovely, soft, pillowy texture is what we’re aiming for. Be careful not to over-whip, or you’ll end up with butter! This stage usually takes just a few minutes with a mixer.
4. Assemble the Sando: The Grand Finnon-alcoholic ale
Now for the most satisfying part – bringin extractg it all together! Lay out your two thick slices of milk bread (or your chosen thick white bread) on a clean work surface. Take one slice of bread and carefully spread the whipped cream evenly over its entire surface. Don’t be shy; you want a good, generous layer of this fluffy goodness. Next, using a spoon, gently lift the sweetened strawberry slices from their bowl, allowing any excess sugary juice to drain back slightly. Arrange these coated strawberry slices in a single layer over the whipped cream on one of the bread slices. Try to cover as much of the cream as possible with the strawberries for an even distribution of flavor and texture.
5. Close and Enjoy: The Sweet Reward
The final step is to complete the sando. Take the second slice of bread and carefully place it on top of the strawberries and cream, creating your sandwich. Gently press down on the top slice of bread to slightly compress the contents and ensure everything stays together. Now, for the best part: you can either enjoy your strawberry sando as is, or for a neater presentation and easier eating, you can carefully slice it in half diagonally with a sharp knife. The sight of the vibrant red strawberries peeking out from the soft bread and creamy filling is truly a reward in itself. Serve immediately and savor the delightful simplicity of this 4-ingredient wonder. It’s a testament to how few ingredients can create something truly extraordinary. Enjoy every single bite!
Conclusion:
And there you have it! This 4-ingredient strawberry sando is a testament to how simple ingredients can create something truly delightful. Its incredible ease of preparation makes it a perfect go-to for busy weeknights, a charming addition to a brunch spread, or even a sweet treat for yourself any time of day. The combination of soft bread, creamy filling, and fresh, juicy strawberries is a classic for a reason. We truly encourage you to give this recipe a try – it’s a crowd-pleaser that requires minimal effort for maximum satisfaction.
Feel free to get creative with your serving! This strawberry sando is wonderful on its own, dusted with a little powdered sugar for extra flair. It also pairs beautifully with a cup of tea or coffee. For variations, consider adding a hint of lemon zest to the whipped cream for a brighter flavor, or a tiny drizzle of honey for added sweetness. You could also experiment with different types of bread, like brioche for a richer taste.
We hope you enjoy making and savoring this wonderfully simple yet delicious treat. It’s a delightful way to celebrate the season’s berries or simply indulge in a moment of sweet comfort.
Frequently Asked Questions:
Can I make the strawberry filling ahead of time?
Yes, absolutely! You can prepare the whipped cream and gently fold in the sliced strawberries a few hours before assembly. Store the mixture in an airtight container in the refrigerator. It’s best to assemble the sandwiches closer to serving time to prevent the bread from becoming soggy.
What if I don’t have fresh strawberries?
While fresh strawberries offer the best flavor and texture, you can use thawed frozen strawberries in a pinch. Be sure to drain them very well to remove excess moisture before adding them to the whipped cream. The texture might be slightly softer, but it will still be delicious.
Is there a way to make this strawberry sando healthier?
You can opt for whole wheat or multi-grain bread for added fiber. For the creamy filling, consider using Greek yogurt mixed with a touch of cream cheese instead of just whipped cream, or use a sugar-free whipped topping if you’re watching your sugar intake. Adjusting the sweetness to your preference is key!
4-Ingredient Strawberry Sando
A quick and delightful Japanese-inspired strawberry sandwich with just four simple ingredients.
Ingredients
-
2 thick slices milk bread (or regular thick white bread, like Texas toast)
-
5 strawberries (with tops removed)
-
1 tbsp white granulated sugar
-
1/2 cup whipping cream (chilled)
-
1/2 tsp vanilla extract (optional, for enhanced flavor)
Instructions
-
Step 1
Wash and hull the strawberries. -
Step 2
Thinly slice the strawberries. -
Step 3
In a small bowl, whip the chilled cream with the granulated sugar and optional vanilla extract until stiff peaks form. -
Step 4
Spread a generous layer of whipped cream onto one slice of bread. -
Step 5
Arrange the sliced strawberries evenly over the whipped cream. -
Step 6
Top with the remaining slice of bread and gently press down. -
Step 7
Slice the sando in half diagonally, if desired, and serve immediately.
Important Information
Nutrition Facts (Per Serving)
It is important to consider this information as approximate and not to use it as definitive health advice.
Allergy Information
Please check ingredients for potential allergens and consult a health professional if in doubt.