Cookie Monster Cheesecake Recipe- Deliciously Fun Dessert
Cookie Monster Cheesecake! Is there any dessert more iconically delightful, more joyfully blue, and more utterly irresistible than a Cookie Monster Cheesecake? I think not! This spectacular dessert is an absolute showstopper, a playful tribute to our favorite fuzzy, blue, cookie-loving fiend that brings a huge smile to everyone’s face, young and old. It’s a guaranteed crowd-pleaser, perfect for birthdays, holidays, or just because you deserve a seriously fun treat.
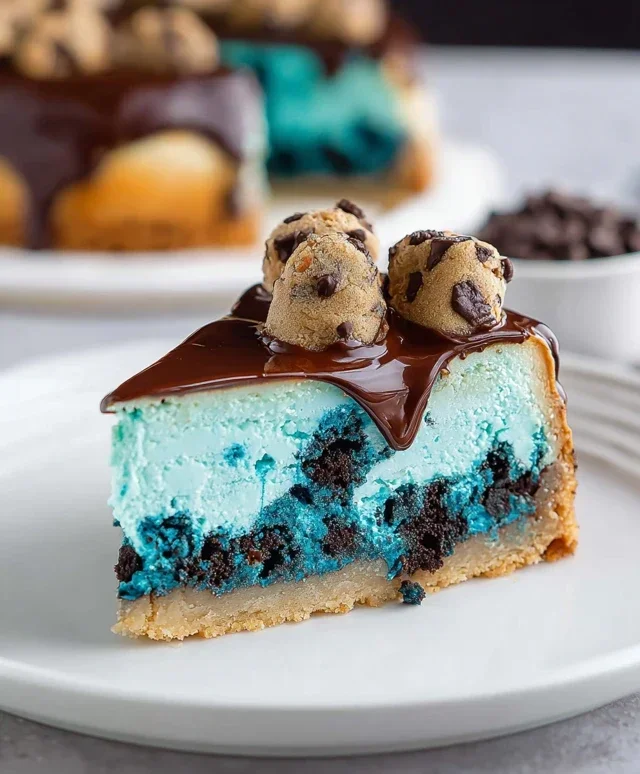
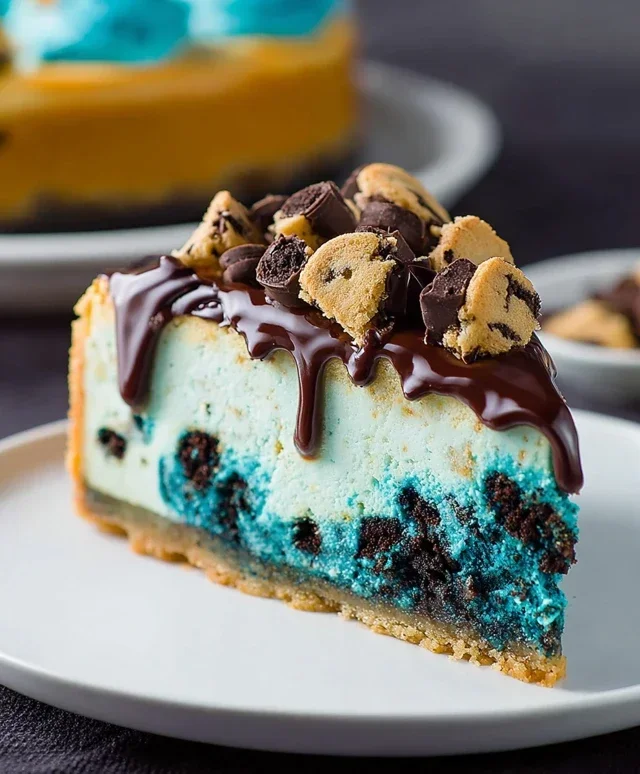
What makes this Cookie Monster Cheesecake so special? It’s more than just a pretty face (or a beautifully blue filling!). We’re talking a rich, creamy cheesecake base, swirled with chunks of chocolate chip cookies, and topped with even more cookie pieces and that signature, vibrant blue hue. It’s a delightful textural adventure, with the smooth cheesecake perfectly contrasting the chewy cookie bits. This isn’t just dessert; it’s a nostalgic trip, a burst of childhood happiness, all wrapped up in a decadent, sliceable package. Get ready to unleash your inner Cookie Monster with this amazing recipe!
Cookie Monster Cheesecake
Get ready to unleash your inner Cookie Monster with this outrageously delicious and visually stunning cheesecake! We’re talking about a rich, creamy, classic cheesecake base swirled with that iconic blue hue and studded with delightful chocolate chips, all nestled on a buttery, slightly sweet cookie-inspired crust. This isn’t just a dessert; it’s a party in every bite, perfect for birthdays, holidays, or just because you deserve something wonderfully decadent. Prepare to impress yourself and everyone lucky enough to snag a slice!
Ingredients:
The Cookie-Inspired Crust
Let’s start by creating a crust that whispers sweet cookie dreams. In a medium bowl, combine the melted unsalted butter, 1/2 tsp salt, and the tightly packed brown sugar. Stir until well combined. This might seem a little sticky, and that’s perfectly normal! Now, add in the 1 egg and 1 tsp of vanilla extract. Whisk everything together until it’s smooth and homogenous. Next, gradually add the all-purpose flour, mixing until just combined to form a thick, dough-like consistency. Don’t overmix here; we want to avoid developing the gluten too much. Finally, gently fold in the semisweet mini chocolate chips. These little gems will add a delightful chew and burst of chocolate flavor throughout the crust. Press this mixture evenly into the bottom of a 9-inch springform pan. Make sure to press it firmly up the sides a little, creating a nice edge for our cheesecake filling. This is your foundation, so take your time to get it nice and even. Once pressed, pop the pan into the freezer for about 15-20 minutes while you prepare the filling. This chilling step helps the crust hold its shape during baking.
The Creamy Blue Dream Filling
Now for the star of the show: the cheesecake filling! In a large mixing bowl, beat the softened cream cheese until it’s completely smooth and creamy. This is crucial to avoid any lumps. You can use an electric mixer on medium speed for this. Make sure your cream cheese is truly at room temperature; it makes a world of difference in achieving a silky texture. Once smooth, add the cornflour, 3.5 oz granulated sugar, and the pinch of salt. Beat again until everything is well incorporated and the mixture is light and fluffy. Scrape down the sides of the bowl frequently to ensure everything is evenly mixed. In a separate small bowl, gently whisk together the cold whipping cream with the blue gel food coloring. Start with a few drops of the gel coloring and add more until you achieve a vibrant, yet pleasing, blue hue reminiscent of our beloved Cookie Monster. Remember, gel food coloring is potent, so a little goes a long way. Slowly pour this blue cream mixture into the cream cheese mixture. Mix on low speed until just combined. We don’t want to overmix at this stage, as it can introduce too much air, which can lead to cracking. Finally, add the 3 room-temperature eggs, one at a time, beating on low speed after each addition until just combined. Again, scrape down the sides of the bowl as needed. Don’t overbeat the eggs; we just want them incorporated. Overmixing can cause the cheesecake to puff up too much and then collapse, leading to cracks.
Baking Your Masterpiece
Preheat your oven to 325°F (160°C). Carefully remove the chilled crust from the freezer. Pour the luscious blue cheesecake filling evenly over the crust. Gently tap the pan on the counter a few times to release any trapped air bubbles. To help prevent cracking and ensure even baking, we’re going to use a water bath. Wrap the bottom and sides of your springform pan securely with heavy-duty aluminum foil, making sure there are no gaps where water can seep in. Place the foil-wrapped springform pan into a larger baking pan or roasting pan. Carefully pour hot water into the larger pan, about halfway up the sides of the springform pan. This creates a humid environment in the oven, which is the secret to a perfectly smooth, crack-free cheesecake.
Bake for approximately 60-75 minutes, or until the edges of the cheesecake are set but the center still has a slight wobble. It should look mostly firm, with just a little bit of jiggle in the very middle. Don’t be tempted to open the oven door too often during baking, as this can cause temperature fluctuations and lead to cracking. Once baked, turn off the oven, crack the oven door open slightly, and let the cheesecake cool inside the oven for another hour. This slow cooling process is another key step in preventing cracks. After the hour in the oven, remove the cheesecake from the water bath and the foil. Let it cool completely on a wire rack at room temperature.
Chilling is Key
Once the cheesecake has cooled to room temperature, cover it loosely with plastic wrap and refrigerate for at least 6 hours, or preferably overnight. This is arguably the most important step for the perfect cheesecake texture and flavor. During this chilling period, the cheesecake will firm up beautifully, and the flavors will meld together. Resist the urge to cut into it too soon!
The Grand Reveal
When you’re ready to serve, carefully run a thin knife or offset spatula around the edge of the cheesecake to loosen it from the sides of the springform pan. Release the clasp and gently lift the ring away. You’ve done it! Admire your stunning, vibrant blue Cookie Monster Cheesecake. Slice it with a sharp knife that has been dipped in hot water and wiped dry between cuts for clean, beautiful slices. Enjoy this delightfully fun and incredibly delicious dessert that’s sure to bring out the Cookie Monster in everyone!
Conclusion:
So there you have it – your ultimate guide to creating a spectacular Cookie Monster Cheesecake! This recipe truly is a showstopper, blending the creamy decadence of classic cheesecake with the irresistible, playful charm of everyone’s favorite blue monster. The vibrant blue swirl, dotted with chunks of chocolate chip cookies and topped with an abundance of cookie crum extractbles and whipped cream, makes for a visually stunning dessert that’s as delightful to look at as it is to devour. It’s perfect for birthdays, parties, or simply when you need a serious dose of fun and deliciousness.
For serving suggestions, I love cutting generous slices and topping them with extra dollops of whipped cream and a sprinkle of blue cookie crum extractbs. You could also add mini chocolate chips or even a few mini Oreos to the top for an extra textural contrast. If you’re feeling adventurous with variations, consider adding a hint of blue raspberry extract to the cheesecake batter for an even more pronounced flavor, or swap out the chocolate chip cookies for crum extractbled Oreos for a cookies-and-cream twist on this already amazing Cookie Monster Cheesecake.
Don’t be intimidated by the cheesecake-making process! This recipe is designed to be accessible, and the joy you’ll get from seeing this creation come to life (and then sharing it!) is absolutely worth it. I encourage you to give this recipe a try; you might just discover your new favorite dessert.
Frequently Asked Questions:
How do I get the perfect blue swirl for my Cookie Monster Cheesecake?
The key to the vibrant blue swirl is using gel food coloring. Start with a small amount and gradually add more until you achieve your desired shade. Gently swirl it into the cheesecake batter with a toothpick or knife, being careful not to overmix, which can dull the color and affect the texture.
Can I make this cheesecake ahead of time?
Absolutely! Cheesecakes are actually best made a day in advance. This allows the flavors to meld and the cheesecake to set completely, resulting in a firmer, richer texture. Cover it tightly with plastic wrap and refrigerating it overnight is highly recommended for the best results.
What if I don’t have cookie crum extractbs for the topping?
No problem at all! You can easily make your own cookie crum extractbs by placing your favorite chocolate chip cookies (or Oreos!) in a resealable bag and crushing them with a rolling pin or the bottom of a heavy glass. Alternatively, crushed grabeef ham crackers or even shortbread cookies would make a delicious topping substitute.
Cookie Monster Cheesecake
A decadent cheesecake inspired by the beloved Cookie Monster, featuring a cookie crust and blue-hued filling.
Ingredients
-
4 oz unsalted butter, melted
-
1/2 tsp salt
-
2.6 oz brown sugar, tightly packed (1/3 cup)
-
4.4 oz all-purpose flour (125 g, 1 cup)
-
4 oz semisweet mini chocolate chips (2/3 cup)
-
16 oz cream cheese, softened
-
2 tsp cornflour (cornstarch)
-
3.5 oz granulated sugar (1/2 cup)
-
Pinch of salt
-
1/2 cup whipping cream
-
Blue gel food coloring
-
1 tsp vanilla extract
-
1 egg
-
3 eggs
Instructions
-
Step 1
Preheat oven to 350°F (175°C). Lightly grease a 9-inch springform pan. -
Step 2
In a bowl, combine melted butter, 1/2 tsp salt, and brown sugar. Stir in flour and chocolate chips. Press mixture into the bottom and slightly up the sides of the prepared pan to form the crust. -
Step 3
Bake the crust for 10-12 minutes until lightly golden. Remove from oven and let cool. -
Step 4
In a large bowl, beat cream cheese until smooth. Beat in cornflour, granulated sugar, pinch of salt, and 1 tsp vanilla extract until well combined. -
Step 5
Beat in the egg and 3 eggs one at a time until just incorporated. Stir in whipping cream and blue gel food coloring until desired color is achieved. -
Step 6
Pour the filling over the cooled crust. Bake for 60 minutes, or until the edges are set and the center is slightly jiggly. -
Step 7
Turn off the oven, crack the door open, and let the cheesecake cool in the oven for 1 hour. Remove from oven and cool completely on a wire rack. Chill for at least 4 hours before serving.
Important Information
Nutrition Facts (Per Serving)
It is important to consider this information as approximate and not to use it as definitive health advice.
Allergy Information
Please check ingredients for potential allergens and consult a health professional if in doubt.