Mini Cannoli Cups- Easy Delightful Recipe
Mini cannoli cups offer a delightful twist on a classic Italian dessert, making them the perfect treat for any occasion. Who can resist the allure of those crisp, golden shells filled with a sweet, creamy ricotta mixture? I know I certainly can’t! The charm of these mini cannoli cups lies not only in their irresistible flavor profile – that perfect balance of sweet cheese and subtle hints of citrus and vanilla – but also in their utterly adorable presentation. They are so much easier to manage than their larger counterparts, making them ideal for parties, potlucks, or simply as an elegant way to satisfy a sweet craving. You get all the iconic taste of traditional cannoli, but in a perfectly portioned, utterly irresistible bite. Get ready to fall in love with these mini cannoli cups all over again!
Mini Cannoli Cups
Get ready to impress your friends and family with these adorable and deceptively simple Mini Cannoli Cups! Forget the hassle of rolling and frying cannoli shells; this recipe uses readily available refrigerated pie crusts to create perfectly shaped, crispy cups that are ideal for filling with a luscious, creamy ricotta mixture. They’re a fantastic make-ahead dessert for parties, holidays, or just when you’re craving a sweet treat with a touch of Italian elegance. The crunchy crust, combined with the sweet and citrusy filling and a sprinkle of chocolate or pistachios, creates a delightful textural and flavor sensation that’s utterly addictive.
Ingredients:
Instructions:
Preparing the Ricotta Filling
The heart of any cannoli is its creamy filling, and ours is no exception. First things first, we need to ensure our ricotta is as dry as possible. This is crucial for a firm, not watery, filling. After draining your whole-milk ricotta cheese for at least an hour, or even better, overnight in the refrigerator using a fine-mesh sieve lined with cheesecloth or a coffee filter, you’ll want to give it one final gentle press to remove any lingering moisture. In a medium bowl, combine the drained ricotta cheese with 1/2 cup of powdered sugar, 2 tablespoons of granulated sugar, the finely grated orange or lemon zest (I personally love the brightness of lemon zest, but orange is equally delicious and traditional!), and 1/2 teaspoon of vanilla extract. Using a spatula or a hand mixer on low speed, gently mix these ingredients until they are well combined and the filling is smooth and creamy. Be careful not to overmix, as this can sometimes make the ricotta too loose. Taste a little bit of the filling at this stage and adjust the sweetness or zest if you desire. This filling is best made a little ahead of time to allow the flavors to meld, so cover it and pop it in the refrigerator while you prepare the crusts.
Creating the Cannoli Cups
Now for the fun part – transforming our humble pie crusts into beautiful cannoli cups! Preheat your oven to 375°F (190°C). Carefully unroll your softened refrigerated pie crusts onto a lightly floured surface. You’ll notice each box typically contains two crusts. You can use them as is, or if you have a larger muffin tin, you might want to slightly overlap two pieces for each cup. Lightly flour a cookie cutter or a rim of a glass that is slightly smaller than the diameter of your muffin tin cups. Using your cookie cutter or glass, cut out as many circles as you can from each pie crust. You’ll want about 12-14 circles in total, depending on the size of your tin and how much you overlap. Gently press each circle of dough into the cups of a lightly greased 12-cup muffin tin. Make sure the dough comes up the sides of the cup to form a shell. You can use your fingers to gently press the dough into the corners. For a slightly neater edge, you can trim any excess dough that hangs over the rim, though a little overhang is perfectly fine and adds to the rustic charm.
Baking the Crispy Shells
This step ensures our cannoli cups have that satisfying crunch. In a small bowl, combine the 3 tablespoons of turbinado sugar with the 1 teaspoon of ground cinnamon. This spiced sugar mixture is going to give our crusts a wonderful flavor and a hint of sweetness. Sprinkle about half of this cinnamon-sugar mixture evenly over the bottom of each unbaked pie crust cup in the muffin tin. This adds flavor directly to the bottom of your cups. Once all your cups are lined with dough and sprinkled with the sugar mixture, it’s time to bake. Place the muffin tin in the preheated oven and bake for approximately 12-15 minutes, or until the crusts are golden brown and slightly puffed. Keep a close eye on them, as pie crust can go from golden to burnt very quickly. You want them beautifully browned but not charred.
Cooling and Filling the Cups
Once baked to perfection, carefully remove the muffin tin from the oven. Let the cannoli cups cool in the muffin tin for about 5-10 minutes. This allows them to firm up slightly before you try to remove them. After this initial cooling period, gently invert the muffin tin onto a wire rack to release the cannoli cups. If any stick slightly, you can gently tap the bottom of the tin. Allow the cups to cool completely on the wire rack. This is crucial; filling warm cups will melt the filling and make a soggy mess. While the cups are cooling, give your ricotta filling another quick stir to ensure it’s smooth and ready. Once the cups are completely cool, spoon or pipe the ricotta filling into each of the baked cannoli cups. Don’t overfill them; you want them to be pleasantly filled, not overflowing.
The Finishing Touches
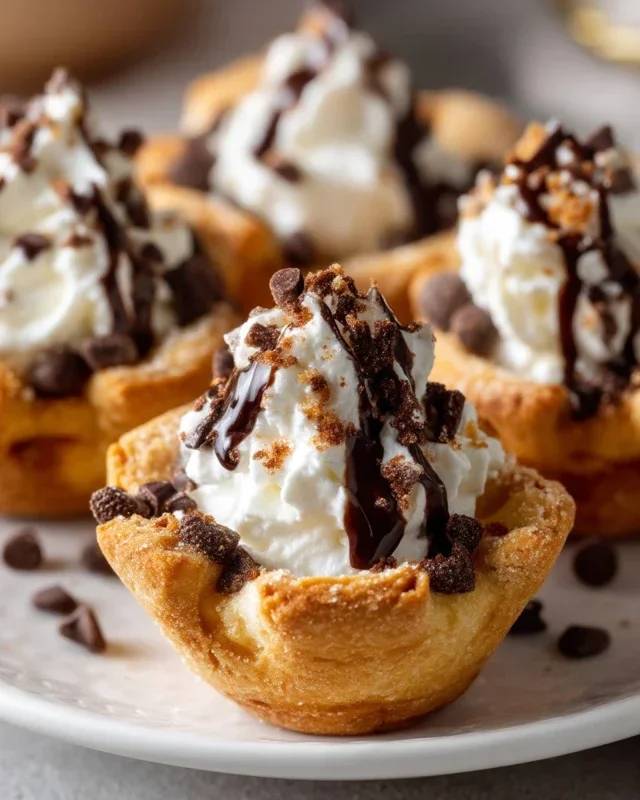
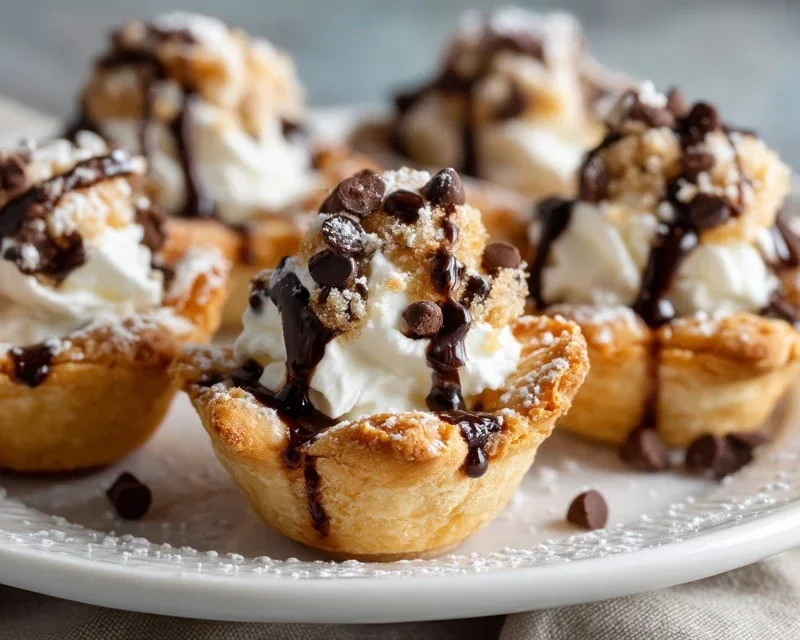
The final flourishes are what elevate these Mini Cannoli Cups from delicious to absolutely show-stopping! Once you’ve filled all your cups, it’s time for the decorative toppings. Sprinkle the 1/4 cup of miniature semisweet chocolate chips or finely chopped pistachios over the top of the filling in each cannoli cup. The mini chocolate chips are a classic choice, providing little bursts of chocolatey goodness, while chopped pistachios offer a beautiful green color and a slightly nutty flavor. For a final, elegant touch, dust the tops of the filled cannoli cups generously with additional powdered sugar using a fine-mesh sieve. This creates that iconic cannoli look and adds a final layer of sweetness. Your Mini Cannoli Cups are now ready to be served and enjoyed! They are best served the same day they are assembled for the crispiest crust, but you can store any unfilled baked shells in an airtight container at room temperature for up to a day.
Conclusion:
So there you have it – your guide to creating absolutely delightful mini cannoli cups! This recipe is a winner because it takes all the beloved flavors and textures of traditional cannoli and makes them accessible and incredibly fun to prepare. The crisp, buttery shells combined with the creamy, sweet ricotta filling offer a truly irresistible dessert experience. They are perfect for parties, bake snon-alcoholic ales, or simply as a special treat to brighten your day. I truly encourage you to give these mini cannoli cups a try; they are surprisingly simple to make and the results are always met with rave reviews!
For serving, these miniature delights are fantastic on their own, showcasing their individual perfection. However, you could also serve them alongside fresh berries for a burst of color and freshness, or with a drizzle of chocolate sauce for an extra decadent touch. Don’t be afraid to get creative with variations either! You can incorporate finely chopped pistachios or chocolate chips directly into the filling for added texture and flavor. For a more festive twist, consider dusting the finished cups with edible glitter or colored sugar.
Frequently Asked Questions:
Can I make the cannoli shells ahead of time?
Yes, you absolutely can! Store the cooled baked shells in an airtight container at room temperature for up to 2 days to maintain their crispness. It’s best to fill them closer to serving time to prevent the shells from becoming soggy.
What’s the best way to store leftover mini cannoli cups?
Store any leftover filled mini cannoli cups in an airtight container in the refrigerator. They are best enjoyed within 1-2 days. Be aware that the shells may soften slightly the longer they are stored.
Can I use a different type of cheese for the filling?
While ricotta is the traditional and ideal choice for its creamy texture and mild flavor, some people have experimented with cream cheese. However, this will significantly alter the taste and texture, so I highly recommend sticking with whole milk ricotta for the most authentic and delicious results.
Mini Cannoli Cups
Delectable mini cannoli cups with a creamy ricotta filling, perfect for a sweet treat.
Ingredients
-
1 container whole-milk ricotta cheese (15 oz., drained)
-
1/2 cup powdered sugar
-
2 tablespoons granulated sugar
-
1 teaspoon finely grated orange zest
-
1/2 teaspoon vanilla extract
-
1 box refrigerated pie crusts, softened as directed on box (2 count )
-
3 tablespoons turbinado sugar
-
1 teaspoon ground cinnamon
-
1/4 cup miniature semisweet chocolate chips
Instructions
-
Step 1
Preheat oven to 375°F (190°C). Lightly grease a mini muffin tin. -
Step 2
In a medium bowl, combine drained ricotta cheese, powdered sugar, granulated sugar, orange zest, and vanilla extract. Mix until smooth and well combined. -
Step 3
Unroll the pie crusts and cut each into 4 equal squares. Press each square into the cups of the prepared mini muffin tin, forming a shell. -
Step 4
Bake for 10-12 minutes, or until golden brown and slightly puffed. -
Step 5
Allow the crusts to cool slightly in the tin before carefully removing them to a wire rack to cool completely. -
Step 6
In a small bowl, combine turbinado sugar and ground cinnamon. Stir in miniature chocolate chips. -
Step 7
Fill each cooled cannoli cup with the ricotta mixture. Sprinkle with the cinnamon-sugar-chocolate chip mixture. -
Step 8
Dust with additional powdered sugar before serving, if desired.
Important Information
Nutrition Facts (Per Serving)
It is important to consider this information as approximate and not to use it as definitive health advice.
Allergy Information
Please check ingredients for potential allergens and consult a health professional if in doubt.