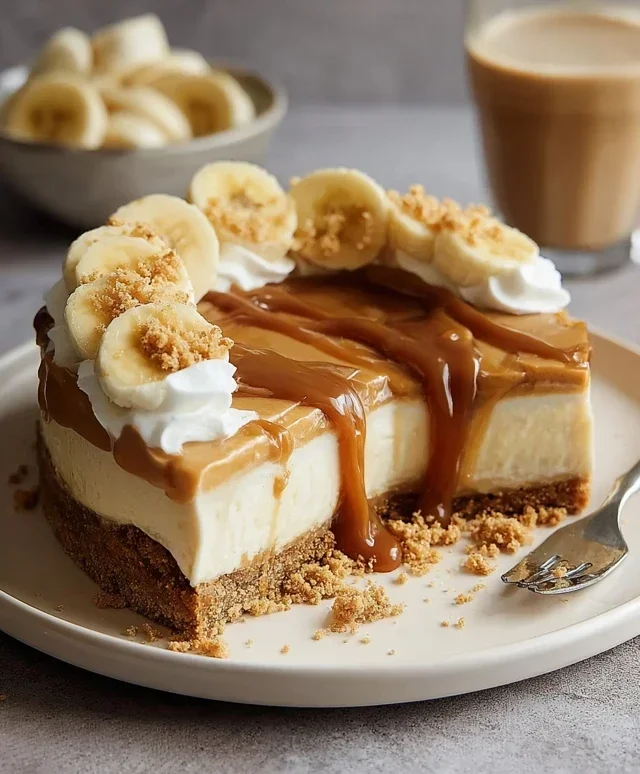
Easy No-Bake Banoffee Cheesecake Recipe
No-Bake Banoffee Cheesecake is the dessert dream you’ve been waiting for, a symphony of sweet, creamy, and crunchy textures that requires absolutely zero oven time. Imagin extracte this: a buttery biscuit base, a generous layer of luscious dulce de leche, perfectly ripe bananas, and a cloud-like whipped cream topping, all coming together in one spectacular no-bake creation. It’s no wonder this banoffee-inspired marvel has captured so many hearts. The irresistible combination of caramel, banana, and cream is pure comfort food bliss. What truly makes this No-Bake Banoffee Cheesecake special is its effortless elegance. You can whip it up for a spontaneous gathering or a quiet night in, and it always feels like a treat. Forget the stress of baking; this recipe is all about pure, unadulterated indulgence with minimal fuss.
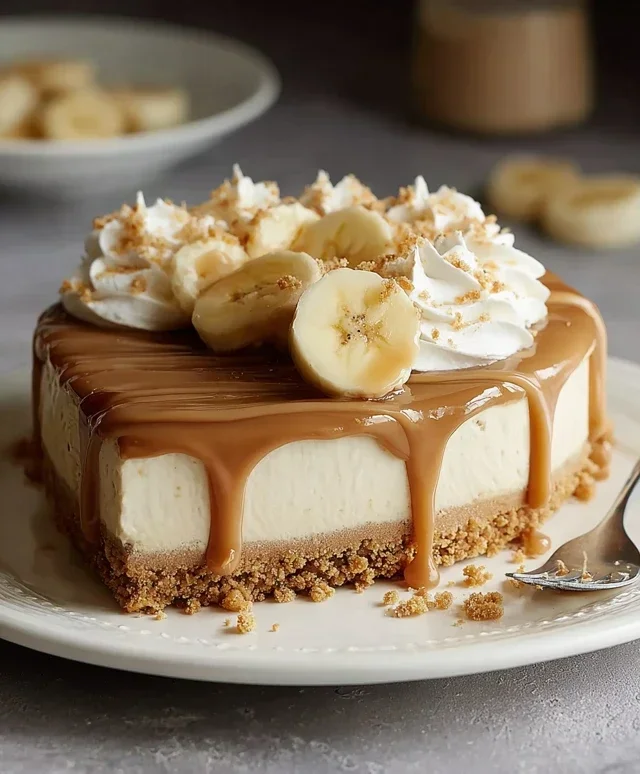
No-Bake Banoffee Cheesecake
If you’re looking for a show-stopping dessert that requires absolutely no oven time, then you’ve landed in the right place! This No-Bake Banoffee Cheesecake is a glorious symphony of sweet, creamy, and caramel-infused goodness, all built upon a crunchy biscuit base. It’s deceptively simple to make, making it perfect for both novice bakers and seasoned pros looking for a fuss-free yet impressive treat. The combination of banana, toffee-like caramel, and a tangy cream cheese filling is utterly irresistible, and the no-bake aspect means you can whip this up even on the hottest of days without heating up your kitchen.
This recipe is also incredibly adaptable. If you need to make it gluten-free, simply swap out the plain biscuits for your favourite gluten-free variety. For those avoiding dairy, we’ve got you covered with dairy-free alternatives for butter, cream cheese, and whipping cream. The cashew nuts provide a wonderfully rich and creamy texture to the filling, mimicking the classic cheesecake feel without any dairy. Get ready to impress your friends and family, or simply treat yourself to a slice of pure bliss.
Ingredients:
Step-by-Step Instructions:
1. Preparing the Biscuit Base
This is where all the crunch and flavour foundation comes from. Start by placing your plain biscuits (or gluten-free alternatives) into a food processor. Blitz them until you have fine crum extractbs. Don’t worry if there are a few slightly larger pieces, as this adds a nice texture to the base. Next, melt the dairy-free butter or margarine in a small saucepan over low heat or in the microwave. Once melted, pour it over the biscuit crum extractbs in the food processor. Pulse a few times until the crum extractbs are evenly coated and resemble wet sand. This ensures the base will hold together well. You’ll need a 20cm (8-inch) springform tin for this recipe. Spoon the crum extractb mixture into the base of the prepared tin and press it down firmly and evenly using the back of a spoon or the base of a glass. Make sure it’s compacted well, as this will create a sturdy crust for your cheesecake. Pop the tin into the refrigerator while you prepare the filling. This chilling time helps the base set and makes it easier to handle.
2. Creating the Creamy Filling
Now for the luxurious part – the filling! Drain the pre-soaked cashew nuts thoroughly. You should have noticed them become plump and soft after their overnight soak. Place these softened cashews into a high-powered blender or food processor. Add the dairy-free cream cheese, coconut cream, and icing sugar to the blender. Coconut cream adds an extra layer of richness and a subtle sweetness, contributing to the overall creamy texture. Blend everything together until the mixture is completely smooth and velvety. This might take a few minutes, and you may need to scrape down the sides of the blender a couple of times to ensure no lumps remain. The goal is a silky-smooth consistency that will form the perfect creamy layer of your cheesecake. Taste the filling at this stage and add a little more icing sugar if you prefer a sweeter cheesecake, but remember we’ll be adding caramel later, which is also sweet.
3. Assembling the Cheesecake Layers
Retrieve your chilled biscuit base from the refrigerator. Take your medium-sized banana and slice it thinly. Arrange these banana slices evenly over the biscuit base. This layer of banana adds that distinct banoffee flavour and a lovely soft texture that complements the creamy filling. Once the banana is in place, carefully spoon the creamy cashew filling over the banana slices. Use a spatula to spread the filling evenly to the edges of the tin, creating a smooth and professional finish. You want a nice, thick layer of creaminess.
4. Adding the Caramel Goodness
This step is crucial for that signature banoffee flavour. Drizzle a generous amount of vegan caramel sauce over the top of the cream cheese filling. You can create a swirled effect by using a skewer or the tip of a knife to gently marble the caramel into the cream cheese, or you can simply create a rustic layer. Aim for a good coating, as the caramel is a star player in this dessert. Don’t be shy with the caramel! You can also gently press a few extra banana slices onto the top if you like, for extra visual appeal and flavour.
5. Chilling and Finishing Touches
Now, the hardest part: waiting. Cover the springform tin with cling film and carefully transfer it to the refrigerator. Allow the cheesecake to chill for at least 4-6 hours, or preferably overnight. This chilling time is essential for the cheesecake to set properly and for all the flavours to meld together. The longer it chills, the firmer and more delicious it will be. Once the cheesecake is firmly set, carefully release the sides of the springform tin. Before serving, whip the dairy-free whipping cream until it forms soft peaks. You can add a touch of sweetener to the whipping cream if you like, but it’s often sweet enough from the caramel. Pipe or dollop the whipped cream around the edge of the cheesecake. Finally, for that extra touch of banoffee magic, drizzle with more vegan caramel sauce just before serving. You can also add a few extra fresh banana slices as a garnish. Slice and serve this incredible no-bake creation and enjoy every single spoonful!
Conclusion:
And there you have it – a simply divine No-Bake Banoffee Cheesecake that’s guaranteed to impress! This recipe is a true winner because it delivers all the rich, decadent flavors of classic banoffee pie without any of the fuss or oven time. The buttery biscuit base, creamy toffee, sweet bananas, and luscious whipped cream topping come together in perfect harmony, creating a dessert that’s both elegant and incredibly easy to make. It’s the perfect solution for those hot summer days or when you simply crave a show-stopping dessert without the commitment of baking.
I love serving slices of this delightful No-Bake Banoffee Cheesecake chilled, perhaps with an extra drizzle of toffee sauce or a scattering of chocolate shavings. It’s also fantastic with a dollop of fresh cream on the side. For those wanting to switch things up, consider adding a layer of chopped chocolate or a hint of espresso powder to the cream cheese mixture for a mocha twist. You could also experiment with different biscuit bases – digestive biscuits are classic, but gin extractger snaps offer a lovely spicy contrast. I truly hope you give this recipe a try; I know you’ll fall in love with its simplicity and incredible taste!
Frequently Asked Questions:
Can I make this No-Bake Banoffee Cheesecake ahead of time?
Absolutely! This cheesecake is actually best made a few hours or even a day in advance. This allows the flavors to meld beautifully and ensures the cheesecake sets up perfectly in the refrigerator. Just cover it tightly and store it until you’re ready to serve.
What if I don’t have digestive biscuits for the base?
No worries at all! You can substitute digestive biscuits with other plain, crum extractbly cookies like grabeef ham crackers, shortbread, or even Oreos (without the cream filling, or with it if you’re feeling extra indulgent!). The key is to have a good, buttery crum extractb that will hold its shape.
How long will the No-Bake Banoffee Cheesecake keep in the fridge?
Properly stored in an airtight container, your No-Bake Banoffee Cheesecake should stay delicious in the refrigerator for up to 3-4 days. However, I doubt it will last that long once people get a taste of it!
No-Bake Banoffee Cheesecake
A decadent no-bake cheesecake inspired by the classic banoffee pie, featuring a biscuit base, creamy cashew filling, banana, and lashings of caramel.
Ingredients
-
200g plain biscuits (use gluten-free biscuits if required)
-
100g dairy-free butter or margarine
-
140g cashew nuts (pre-soaked in warm water overnight)
-
340g dairy-free cream cheese
-
50g coconut cream
-
80g icing sugar
-
1 medium-sized banana
-
Vegan caramel sauce (store-bought or homemade)
-
Fresh banana slices
-
80ml dairy-free whipping cream
Instructions
-
Step 1
Crush the plain biscuits into fine crumbs. Melt the dairy-free butter or margarine and mix it with the biscuit crumbs until well combined. Press this mixture firmly into the base of a springform cake tin to form the crust. -
Step 2
Drain the pre-soaked cashew nuts. In a high-speed blender, combine the drained cashew nuts, dairy-free cream cheese, coconut cream, and icing sugar. Blend until completely smooth and creamy, scraping down the sides as needed. -
Step 3
Mash the medium-sized banana and spread it evenly over the biscuit base in the prepared tin. -
Step 4
Pour the cashew cream mixture over the mashed banana layer and smooth the top with a spatula. -
Step 5
Chill the cheesecake in the refrigerator for at least 4-6 hours, or until firm. For best results, chill overnight. -
Step 6
Once set, carefully remove the cheesecake from the springform tin. Drizzle generously with vegan caramel sauce and decorate with fresh banana slices. -
Step 7
Whip the dairy-free whipping cream until soft peaks form. Serve the cheesecake with a dollop of whipped cream on the side.
Important Information
Nutrition Facts (Per Serving)
It is important to consider this information as approximate and not to use it as definitive health advice.
Allergy Information
Please check ingredients for potential allergens and consult a health professional if in doubt.