Easy Christmas Tree Rolls- Festive Dinner Delight
Christmas Tree Rolls are more than just a side dish; they’re a whimsical edible centerpiece that instantly elevates any holiday feast. Imagin extracte pulling apart fluffy, warm bread shaped like a festive evergreen, each bite a burst of comforting, savory goodness. It’s no wonder these delightful creations have become a beloved tradition for so many families. The sheer joy and visual appeal they bring to the table are unmatched, sparking smiles and delightful conversation even before the main course is served. What truly makes these Christmas Tree Rolls special is the perfect balance of tender dough, often infused with subtle herbs or garlic, and a golden-brown exterior that promises pure satisfaction. They’re surprisingly simple to make, yet they carry an undeniable air of magic, transforming an ordinary meal into a memorable holiday experience. Get ready to impress your loved ones with this show-stopping, delicious recipe!
Ingredients:
- 1 can (12.5 oz) refrigerated Pillsbury Cinnamon Rolls with icing
- Christmas sprinkles
Preparing the Christmas Tree Rolls
This is where the magic of transforming a simple can of cinnamon rolls into festive Christmas tree rolls begin extracts! The beauty of this recipe lies in its simplicity, making it a perfect activity for families or anyone looking to add a touch of homemade holiday cheer without spending hours in the kitchen. We’re taking those ready-made cinnamon rolls and giving them a playful, seasonal makeover.
First things first, preheat your oven according to the package directions for the Pillsbury Cinnamon Rolls. This is crucial for ensuring they bake up evenly and achieve that perfect golden-brown color and fluffy texture we all love. While the oven heats, get your baking sheet ready. It’s a good idea to line it with parchment paper or a silicone baking mat. This prevents any potential sticking and makes cleanup a breeze, giving you more time to enjoy the festive spirit.
Now, carefully open the can of cinnamon rolls. Be sure to do this on a flat surface, and remember that the dough can expand, so handle it with care. Gently unroll the dough without tearing it. You’ll see the delightful swirls of cinnamon sugar ready to bake. For our Christmas tree shape, we need to do a little bit of strategic cutting. Using a sharp knife or a pizza cutter, cut each cinnamon roll into approximately four equal wedges. Think of it like cutting a pie into slices, but don’t worry about perfect precision – a little rustic charm is part of the fun!
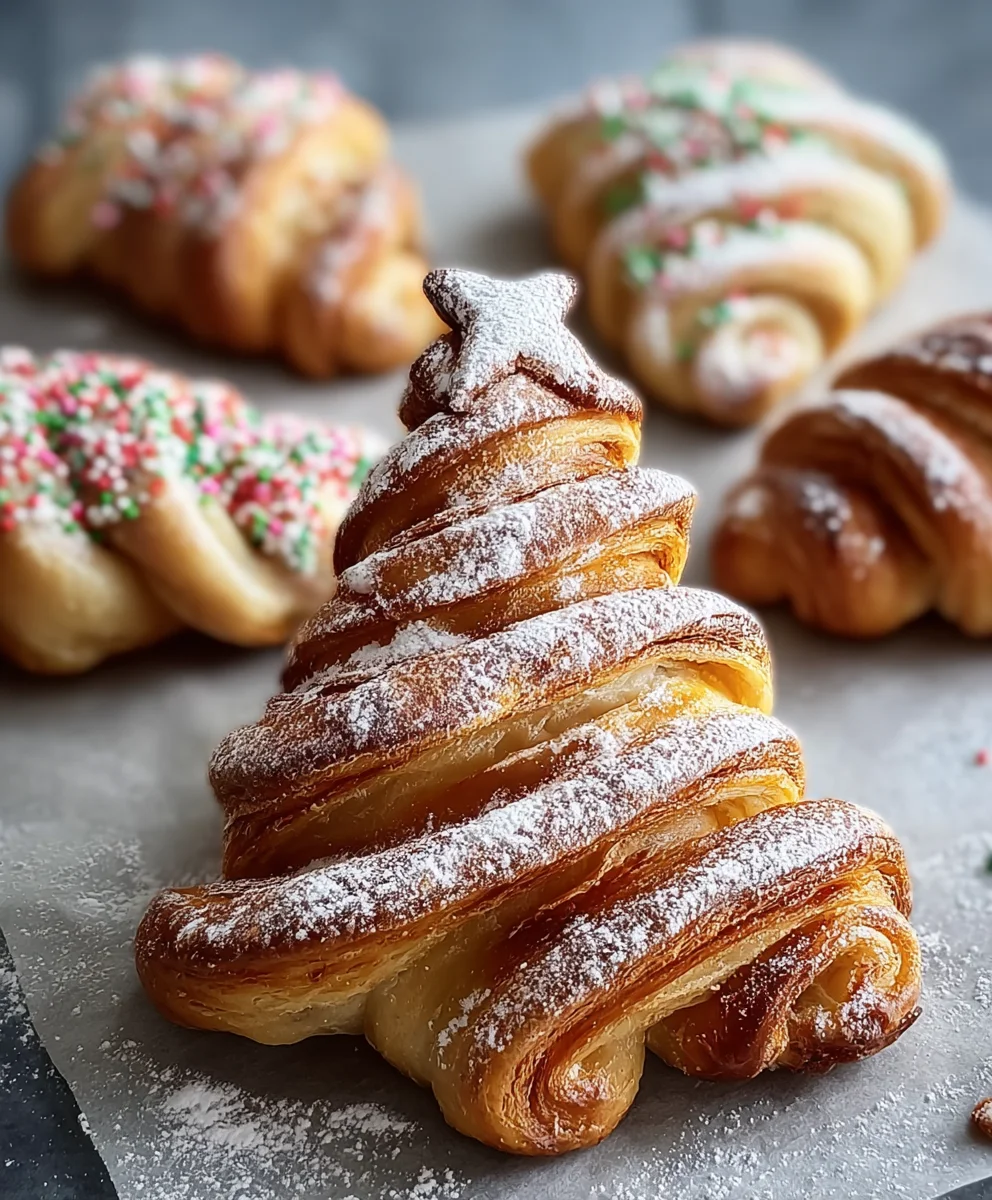
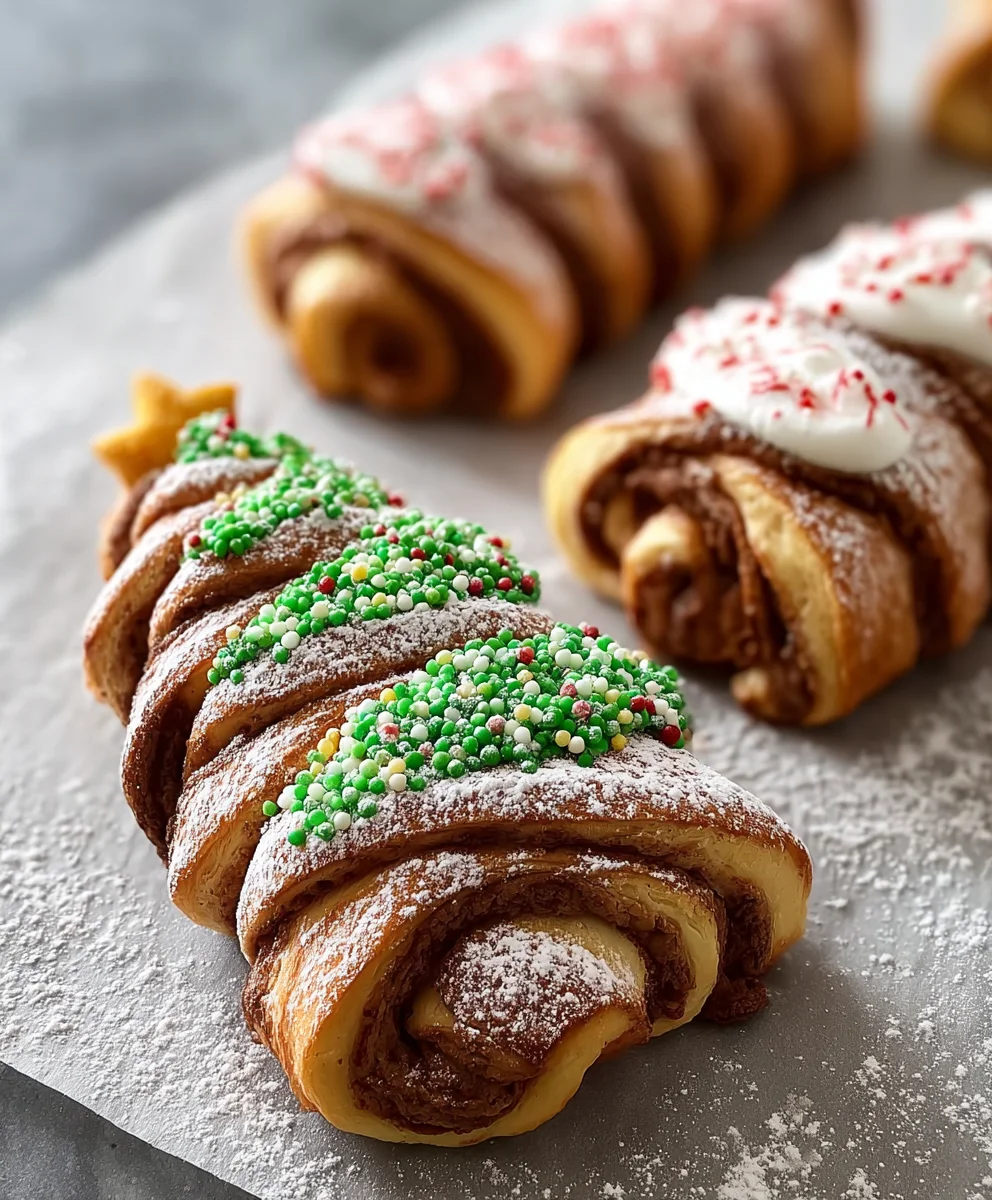
Once you have your wedges, arrange them on the prepared baking sheet. Here’s the key to the tree shape: place one wedge at the bottom center of where you want your “tree trunk” to start. Then, place two wedges on top of the first, slightly overlapping and angled outwards to form the base of your tree. Continue layering, using one wedge at a time and overlapping them slightly, to create a tiered effect that gradually gets narrower as you go up. You’ll want to leave a little bit of space between each wedge on the baking sheet, as they will expand as they bake. Don’t be afraid to get creative with the arrangement; some trees might be a little wider at the bottom, some might be more slender. The goal is to create a shape that hints at a Christmas tree. You might use anywhere from 3 to 5 wedges per tree, depending on how large you want your festive treats to be.
Baking the Festive Treats
Now it’s time to bake these adorable Christmas tree rolls. Carefully place the baking sheet into your preheated oven. Refer to the baking time suggested on the Pillsbury Cinnamon Rolgin extractpackaging, but keep a close eye on them. Since we’ve cut and rearranged the rolls, the baking time might vary slightly. You’re looking for them to be beautifully golden brown around the edges and puffed up nicely. The cinnamon filling should be gooey and fragrant. Avoid overbaking, as this can lead to dry rolls. The aroma filling your kitchen will be a sure sign that the holidays are truly arriving!
Decorating Your Christmas Tree Rolls
Once your Christmas tree rolls are baked to perfection, remove them from the oven and let them cool on the baking sheet for a few minutes. This is a crucial step before applying the icing. If they’re too hot, the icing will melt and run off too quickly, and we want that lovely, opaque coating. While they’re still slightly warm, it’s time for the pièce de résistance: the icing!
Open the can of icing that came with your cinnamon rolls. If it seems a little stiff, you can microwave it for just a few seconds (be careful not to overheat it!) or stir in a tiny splash of milk to make it more spreadable. Drizzle the icing over the top of each baked cinnamon roll, allowing it to cascade down the sides, mimicking snow or festive garlands. Be generous! This is where the real visual transformation happens.
Finally, before the icing sets, it’s time to add the sparkle. Grab your Christmas sprinkles! This is where you gin extract let your imagination run wild. Sprinkle them liberally over the still-wet icing. You can use a mix of colors, shapes, and sizes to create a truly dazzling effect. Think about classic Christmas colors like red, green, and white, or perhaps some gold and silver for extra shimmer. You can sprinkle them all over for a uniform festive look, or concentrate them on certain “branches” of your tree-shaped rolls. Some people even like to use star-shaped sprinkles for the very top of the tree! The sprinkles add not only visual appeal but also a delightful little crunch with every bite. These Christmas Tree Rolls are now ready to be devoured and admired!
Conclusion:
There you have it – a delightful and festive way to bring some extra cheer to your table with these beautiful Christmas Tree Rolls! These aren’t just delicious; they’re a visual masterpiece that will impress your guests and bring smiles to everyone, young and old. The tender dough, infused with subtle savory notes, makes them a perfect accompaniment to any holiday meal, from hearty stews to lighter fare. Don’t be intimidated by their appearance; the shaping is simpler than it looks, and the result is truly worth the effort.
For serving, consider placing them strategically around your main dish as edible decorations, or arrange them in a cluster for a charming centerpiece. They’re wonderfully versatile and pair excellently with butter, herbed dips, or even a touch of cranberry sauce for a sweet and savory twist. When it comes to variations, feel free to experiment! You can add a pinch of garlic powder or onion powder to the dough for an extra layer of flavor, or brush them with melted garlic butter after baking for a richer taste. Even a sprinkle of poppy seeds or sesame seeds before baking can add a lovely textural contrast. We truly encourage you to give these Christmas Tree Rolls a try this holiday season – they’re guaranteed to become a cherished part of your traditions!
Frequently Asked Questions:
Q: Can I make the Christmas Tree Rolls ahead of time?
Yes, you absolutely can! You can prepare the dough and let it rise, then shape the rolls and place them on a baking sheet. Cover them loosely with plastic wrap and refrigerate for up to 24 hours. When you’re ready to bake, let them sit at room temperature for about 30 minutes, then proceed with the baking instructions. They might need an extra minute or two in the oven since they’ll be starting from a colder temperature.
Q: What can I do if my Christmas Tree Rolls don’t look perfectly like a tree?
Don’t worry at all! The charm of homemade food lies in its imperfections. Even if your “branches” aren’t perfectly uniform, the festive shape will still be recognizable and delightful. The most important thing is that they taste delicious. You can always add a few extra small dough stars on top of any rolls that might look a little less tree-like after baking for added decoration.
Easy Christmas Tree Rolls
Transform store-bought cinnamon rolls into festive, edible Christmas trees for a delightful holiday treat.
Ingredients
-
1 can (12.5 oz) refrigerated Pillsbury Cinnamon Rolls
-
Icing (from can)
-
Christmas sprinkles
-
Parchment paper or silicone baking mat
-
Sharp knife or pizza cutter
Instructions
-
Step 1
Preheat oven according to Pillsbury Cinnamon Rolls package directions. Line a baking sheet with parchment paper or a silicone baking mat. -
Step 2
Carefully open the can of cinnamon rolls. Gently unroll the dough. Cut each cinnamon roll into approximately four equal wedges. -
Step 3
Arrange the wedges on the prepared baking sheet to form a Christmas tree shape. Start with one wedge at the bottom center, then layer two wedges on top, angled outwards, and continue layering with fewer wedges as you move upwards. Leave space between wedges for expansion. -
Step 4
Bake for the time recommended on the cinnamon roll packaging, or until golden brown and puffed. Keep a close eye as baking time may vary. -
Step 5
Remove from oven and let cool on the baking sheet for a few minutes. -
Step 6
Open the can of icing. If stiff, microwave briefly or stir in a tiny splash of milk. Drizzle the icing over the warm rolls, allowing it to cascade down. -
Step 7
While the icing is still wet, liberally sprinkle with Christmas sprinkles to decorate your tree-shaped rolls.
Important Information
Nutrition Facts (Per Serving)
It is important to consider this information as approximate and not to use it as definitive health advice.
Allergy Information
Please check ingredients for potential allergens and consult a health professional if in doubt.