Christmas Lights Sugar Cookies – Easy Holiday Baking Fun
Christmas Lights Sugar Cookies are more than just a festive treat; they’re a cherished tradition, a sparkling beacon of holiday joy that lights up kitchens and hearts alike. What is it about these vibrant, decorated cookies that makes them an absolute must-have during the holiday season? Perhaps it’s the simple, buttery sweetness that melts in your mouth, or the delightful crunch that signals the season’s arrival. More than that, these Christmas Lights Sugar Cookies offer a canvas for your creativity, transforming them into miniature works of edible art. Each cookie, adorned with colorful icing, evokes the very sparkle of the holiday lights themselves, bringin extractg a sense of wonder and festivity to every bite. They’re the perfect accompaniment to carols, a warm fireplace, and the company of loved ones, making them an indispensable part of any truly magical Christmas celebration.
Ingredients:
- 6 cups all-purpose flour, plus more for dusting
- 2 teaspoons baking powder
- 2 teaspoons salt
- 4 sticks unsalted butter, softened to room temperature (this is about 1 pound of butter)
- 2 cups granulated sugar
- 2 large eggs, at room temperature
- 2 teaspoons pure vanilla extract
- 16 ounces powdered sugar (about 1 pound)
- 1/4 cup plus 1 tablespoon meringue powder
- 1/3 cup water, plus a little more if your frosting is too thick
- Food coloring (I recommend Wilton icing gels for vibrant colors)
Making the Christmas Lights Sugar Cookies Dough
Step 1: Combine Dry Ingredients
In a medium bowl, whisk together the 6 cups of all-purpose flour, 2 teaspoons of baking powder, and 2 teaspoons of salt. This step ensures that the leavening agents and salt are evenly distributed throughout the flour, which is crucial for consistent cookie texture. Set this dry mixture aside for now.
Step 2: Cream Butter and Sugar
In a large bowl, or the bowl of your stand mixer fitted with the paddle attachment, cream together the 4 sticks of softened unsalted butter and 2 cups of granulated sugar. Beat them together on medium speed until the mixture is light and fluffy, pnon-alcoholic ale yellow in color, and has increased in volume. This usually takes about 3-5 minutes. Properly creaming the butter and sugar incorporates air, which contributes to a tender cookie.
Step 3: Add Wet Ingredients to Butter Mixture
Add the 2 large room-temperature eggs to the creamed butter and sugar mixture, one at a time, beating well after each addition until fully incorporated. It’s important for the eggs to be at room temperature so they emulsify more easily with the fat, preventing a greasy dough. Next, beat in the 2 teaspoons of pure vanilla extract. Mix until everything is well combined and smooth.
Step 4: Gradually Add Dry Ingredients
With the mixer on low speed, gradually add the flour mixture from Step 1 to the wet ingredients. Mix just until the flour is incorporated and no dry streaks remain. Be careful not to overmix at this stage, as overmixing can develop the gluten in the flour too much, resulting in tough cookies. The dough will be thick and slightly crum extractbly at first, but as you mix, it should come together. Once combined, you can finish mixing with a spatula by hand to ensure everything is incorporated without overworking the dough.
Step 5: Chill the Dough
Divide the dough into two equal portions. Flatten each portion into a disk, wrap tightly in plastic wrap, and refrigerate for at least 2 hours, or preferably overnight. Chilling the dough is an essential step for sugar cookies. It firms up the butter, making the dough easier to roll and cut without spreading excessively during baking. This also allows the flavors to meld, resulting in a more delicious cookie.
Rolling and Baking the Cookies
Step 6: Prepare for Rolling
When you’re ready to bake, preheat your oven to 350°F (175°C). Line baking sheets with parchment paper. This prevents the cookies from sticking and makes for easy cleanup. Take one disk of chilled dough from the refrigerator. Lightly flour your work surface and a rolling pin.
Step 7: Roll and Cut the Dough
Roll out the dough to about 1/4 inch thickness. If the dough becomes too soft or sticky while rolling, return it to the refrigerator for about 15-20 minutes to firm up again. Use your favorite Christmas-themed cookie cutters to cut out shapes. As you cut, gently transfer the cookies to the prepared baking sheets, leaving about 1-2 inches of space between them to allow for slight expansion. Re-roll scraps of dough as needed, chilling them briefly if they become too soft.
Step 8: Bake the Cookies
Bake the cookies for 8-12 minutes, or until the edges are lightly golden brown. The baking time will vary depending on the size and thickness of your cookies. Keep a close eye on them, as sugar cookies can go from perfectly baked to overdone very quickly. Once baked, let the cookies cool on the baking sheets for 5 minutes before transferring them to a wire rack to cool completely. It’s very important that they are completely cool before you begin extract decorating.
Creating the Christmas Lights Icing
Step 9: Make the Royal Icing Base
In a clean, dry bowl of your stand mixer (or using a hand mixer), combine the 16 ounces of powdered sugar and the 1/4 cup plus 1 tablespoon of meringue powder. Add the 1/3 cup of water. Beat on low speed for about 1 minute until the ingredients are just combined and there is no dry powder visible.
Step 10: Whip the Icing to Desired Consistency
Increase the mixer speed to medium-high and beat for 5-7 minutes. The icing will become very thick, white, and glossy. This process incorporates air and creates the characteristic smooth texture of royal icing. If the icing seems too thick for your liking after this initial whipping, you can add additional water, 1 teaspoon at a time, until you reach your desired consistency for outlining and flooding. For a thinner flooding consistency, you might need a little more water.
Step 11: Divide and Color the Icing
Once your base icing is made, divide it into separate bowls. You’ll want at least several colors to mimic Christmas lights. Add drops of food coloring (Wilton icing gels are recommended for their concentrated pigment) to each bowl and mix thoroughly until you achieve vibrant colors. For Christmas lights, think classic red, green, blue, yellow, and perhaps some white for contrast. Be sure to mix well to ensure the color is uniform throughout.
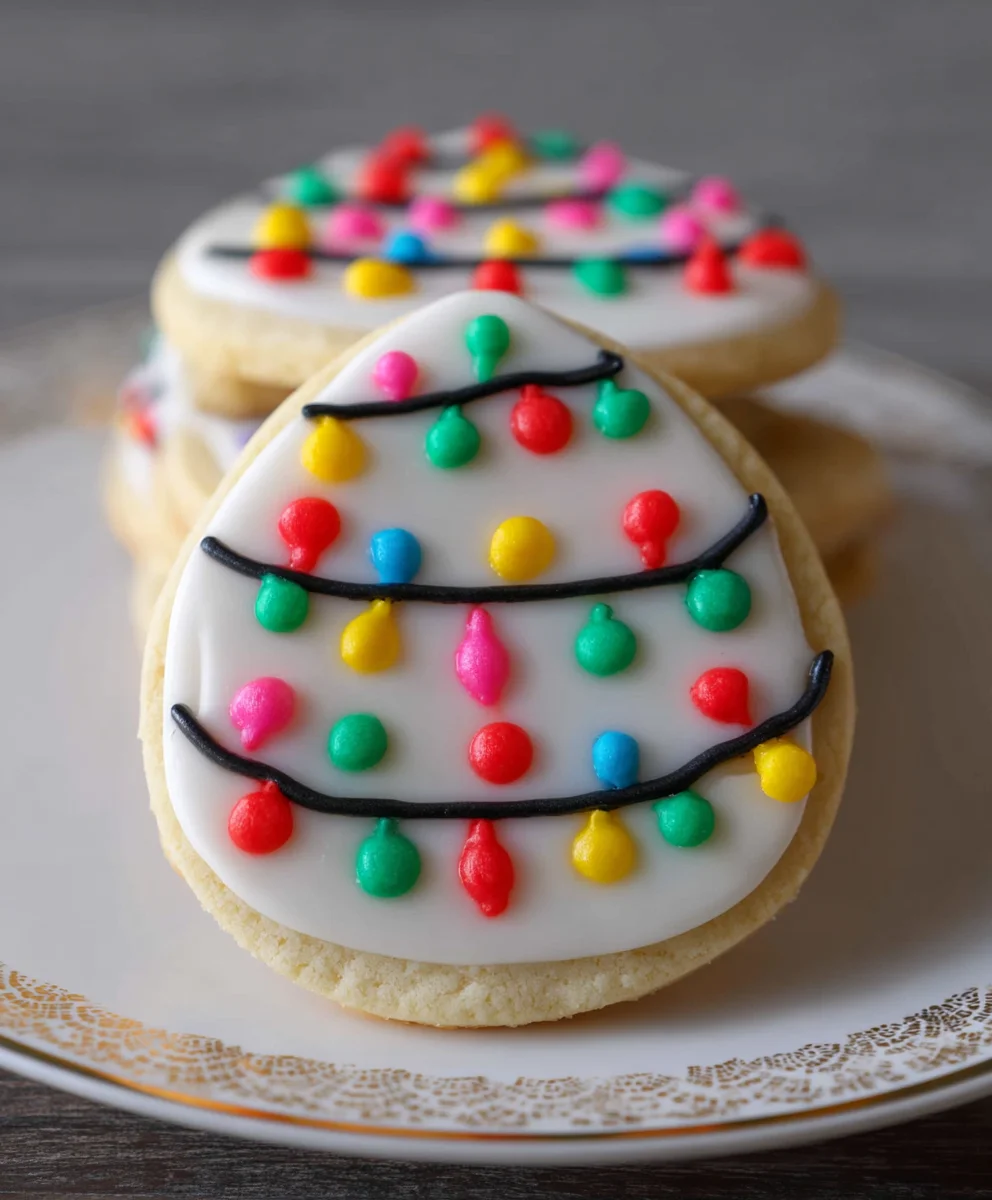
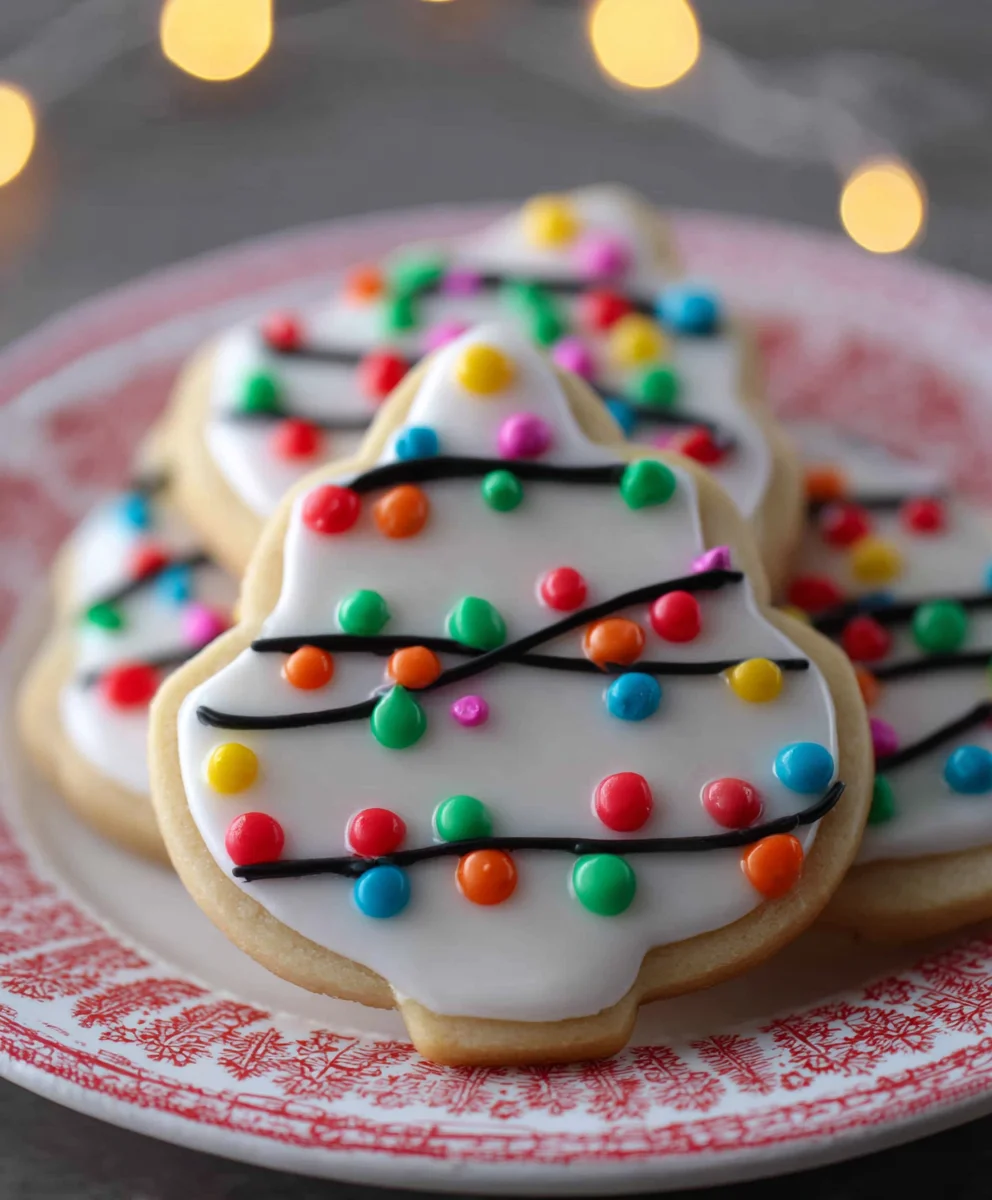
Step 12: Decorate Your Christmas Lights Sugar Cookies
Once your cookies are completely cool and your icing is colored and at the right consistency, it’s time to decorate! Use piping bags fitted with small round tips for outlining the cookies. Once the outlines have set slightly (about 15-20 minutes), use a slightly thinner icing in a squeeze bottle or a piping bag with a larger opening to flood the insides of the outlines. You can then add details like dots, lines, or even small icicles to create a festive “Christmas lights” effect. Let the decorated cookies dry completely for at least 8-12 hours, or ideally overnight, before stacking or storing them. This ensures the icing is fully set and won’t smudge.
Conclusion:
And there you have it! Your very own batch of dazzling Christmas Lights Sugar Cookies, ready to spread holiday cheer. These cookies are not just a treat for the taste buds but a feast for the eyes, perfectly capturing the festive spirit of the season. I hope you’ve enjoyed the process as much as I do, and that these vibrant cookies become a cherished part of your holiday traditions. Don’t be afraid to get creative with your decorating – the brighter and bolder, the better!
These delightful Christmas Lights Sugar Cookies are wonderfully versatile. They make an excellent addition to any cookie platter, a thoughtful homemade gift, or even a fun activity for the whole family to decorate together. Serve them alongside a warm mug of cocoa or a steaming cup of spiced cider for the ultimate cozy holiday experience. For a creative twist, consider adding a touch of edible glitter for extra sparkle, or using different colored icing to mimic a wider array of festive lights. Feel free to experiment with different cookie cutters and shapes to truly make them your own!
Frequently Asked Questions:
Can I make these Christmas Lights Sugar Cookies ahead of time?
Absolutely! The dough can be made a day or two in advance and stored in the refrigerator. Once baked and cooled, decorated cookies can be stored in an airtight container at room temperature for up to a week. This makes them perfect for prepping before the busy holiday rush.
What kind of icing is best for decorating Christmas Lights Sugar Cookies?
A classic royal icing is ideal for decorating these cookies. It dries hard and smooth, allowing for crisp lines and intricate designs. You can also use a buttercream frosting for a softer texture and richer flavor, though it may not hold sharp details as well.
Christmas Lights Sugar Cookies – Easy Holiday Baking Fun
Fun and easy sugar cookies decorated to look like festive Christmas lights, perfect for holiday baking.
Ingredients
-
6 cups all-purpose flour, plus more for dusting
-
2 teaspoons baking powder
-
2 teaspoons salt
-
4 sticks unsalted butter, softened to room temperature (1 pound)
-
2 cups granulated sugar
-
2 large eggs, at room temperature
-
2 teaspoons pure vanilla extract
-
16 ounces powdered sugar (1 pound)
-
1/4 cup plus 1 tablespoon meringue powder
-
1/3 cup water, plus a little more if your frosting is too thick
-
Food coloring (Wilton icing gels recommended)
Instructions
-
Step 1
In a medium bowl, whisk together flour, baking powder, and salt. In a large bowl, cream softened butter and granulated sugar until light and fluffy. Beat in eggs one at a time, then vanilla extract. Gradually add the dry ingredients to the wet ingredients, mixing until just combined. Do not overmix. Divide dough into two disks, wrap tightly, and chill for at least 2 hours. -
Step 2
Preheat oven to 350°F (175°C). Line baking sheets with parchment paper. Lightly flour a work surface and rolling pin. Roll out chilled dough to about 1/4 inch thickness. Cut out shapes using Christmas-themed cookie cutters. Transfer cookies to prepared baking sheets, leaving 1-2 inches between them. -
Step 3
Bake for 8-12 minutes, or until edges are lightly golden brown. Let cool on baking sheets for 5 minutes before transferring to a wire rack to cool completely. Ensure cookies are fully cool before decorating. -
Step 4
In a mixer bowl, combine powdered sugar and meringue powder. Add water and beat on low speed for 1 minute until combined. Increase speed to medium-high and beat for 5-7 minutes until thick, white, and glossy. Add more water, 1 teaspoon at a time, if a thinner consistency is desired. -
Step 5
Divide icing into separate bowls and add food coloring to create vibrant Christmas light colors. Use piping bags with small tips to outline cookies. Once outlines set slightly, flood the insides with a slightly thinner icing. Add details to create a Christmas lights effect. Let decorated cookies dry completely for at least 8-12 hours before storing.
Important Information
Nutrition Facts (Per Serving)
It is important to consider this information as approximate and not to use it as definitive health advice.
Allergy Information
Please check ingredients for potential allergens and consult a health professional if in doubt.