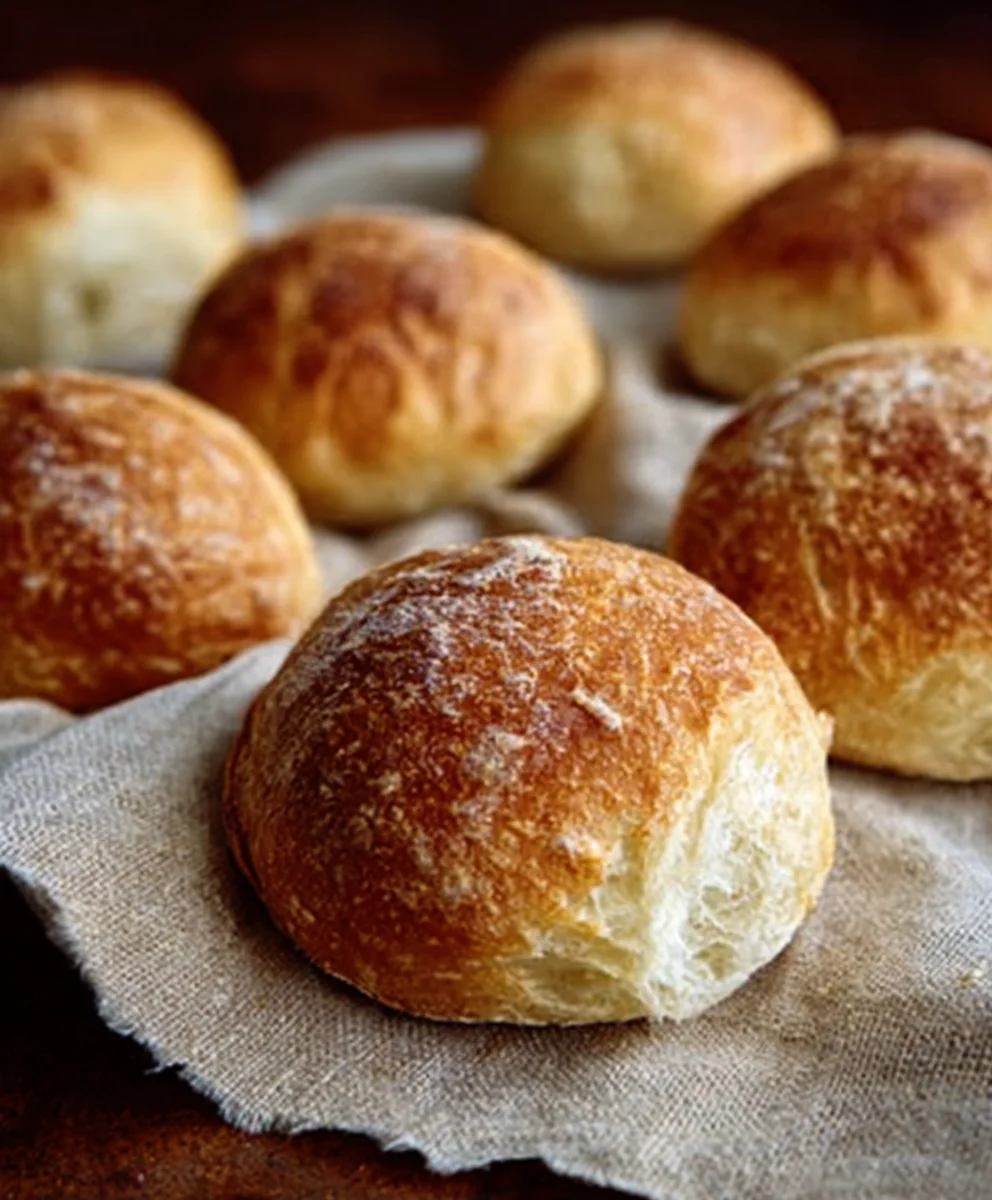
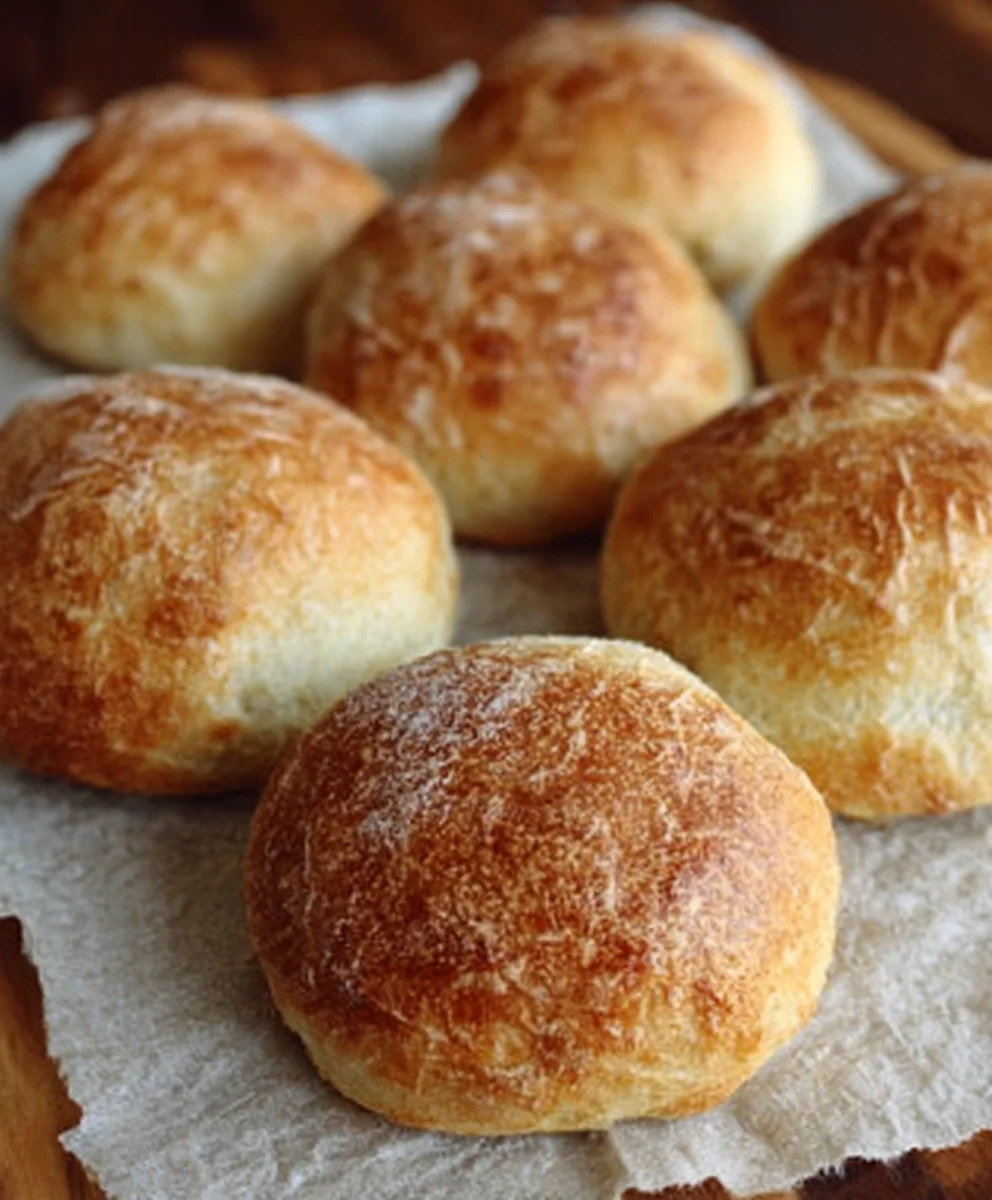
No Knead Crusty Rolls – Easy Homemade Bread Recipe
No Knead Crusty Rolls are the whisper of warm bread on a cool morning, the comforting aroma that fills your kitchen and beckons everyone to the table. If you’ve ever dreamt of effortlessly creating those perfectly golden, wonderfully chewy rolls with that satisfyingly crisp exterior, then you’re in the right place. These No Knead Crusty Rolls are a revelation for home bakers of all levels. Forget the strenuous kneading and lengthy proofing times; this recipe simplifies the process without sacrificing an ounce of flavor or texture. What truly makes these rolls so beloved is their incredible versatility – they’re perfect alongside a hearty stew, toasted with butter for breakfast, or even as the base for a delicious sandwich. We’ll guide you through each simple step, ensuring you achieve bakery-quality results that will have your family singin extractg your praises.
Why You’ll Adore These
The magic of these No Knead Crusty Rolls lies in their simplicity and the sheer delight they brgin extract. Imagine sinking your teeth into a roll that boasts a tender, airy interior juxtaposed with a shatteringly crisp crust – that’s the promise of this recipe. It’s the kind of bread that makes you feel like a culinary hero, even if you’ve never baked before. The minimal effort involved is a huge draw, allowing busy home cooks to enjoy fresh, homemade bread without feeling overwhelmed. Plus, the addictive aroma that permeates your home as they bake is simply unparalleled.
What Makes Them Special
The secret to the incredible texture of these No Knead Crusty Rolls is a slow, gentle fermentation that develops deep flavor and an open crum extractb. This method allows time to do the work of gluten development, meaning your hands get a break! The combination of high hydration and a hot oven creates that signature crust. We’ll delve into the specific techniques that ensure a perfect rise and a beautiful, crackly exterior every single time. Get ready to experience the joy of truly exceptional homemade bread.
Ingredients:
- 4 cups all-purpose flour, plus more for dusting
- 1.5 teaspoons instant yeast
- 1.5 teaspoons fine sea salt
- 1.75 cups lukewarm water (about 105-115°F)
- Cornmeal, for dusting baking sheet (optional)
Mixing and Initial Rise
Step 1: Combine Dry Ingredients
Begin extract by gathering all your dry ingredients. In a large mixing bowl, preferably one that can accommodate a significant rise in volume, whisk together the 4 cups of all-purpose flour, 1.5 teaspoons of instant yeast, and 1.5 teaspoons of fine sea salt. Ensuring these are thoroughly combined at this stage helps to distribute the yeast and salt evenly throughout the flour, which is crucial for a consistent rise and flavor development in your no knead crusty rolls. Instant yeast doesn’t require proofing, making this recipe incredibly simple and quick to get started.
Step 2: Add Lukewarm Water and Mix
Next, pour 1.75 cups of lukewarm water into the bowl with the dry ingredients. This is the only liquid you’ll need. The water temperature is important; it should be lukewarm, not hot or cold. Water that is too hot can kill the yeast, and cold water will slow down its activity. Aim for that comfortable temperature you’d use for a baby’s bath. Using a wooden spoon or a sturdy spatula, mix the ingredients until just combined. You’ll end up with a shaggy, sticky dough. Don’t be tempted to add more flour at this stage, even if it seems excessively wet. The stickiness is exactly what we’re looking for in a no-knead dough; it contributes to the airy, open crum extractb we desire in these crusty rolls. Mix for about 30 seconds to a minute, ensuring there are no dry pockets of flour remaining.
Step 3: First Rise (Bulk Fermentation)
Cover the bowl tightly with plastic wrap or a damp kitchen towel. This will prevent the dough from drying out as it rises. Let the dough rest at room temperature for a minimum of 12 hours, or up to 18 hours. This long, slow fermentation is the magic behind the no-knead method. During this time, the yeast will work its way through the flour, developing complex flavors and creating tiny air bubbles. The dough will become bubbly, significantly increase in volume, and develop a somewhat elastic texture. You’ll notice it will have doubled or even tripled in size by the end of this period. A warmer room will accelerate the rise, while a cooler room will slow it down. If your kitchen is very warm, you might consider a slightly shorter rise time to avoid over-proofing.
Shaping and Second Rise
Step 4: Divide and Shape the Dough
After the long first rise, the dough will be very airy and somewhat sticky. Lightly flour your work surface. You can also lightly flour your hands. Gently scrape the dough out of the bowl onto the floured surface. The dough will be quite wet and might deflate slightly as you move it; this is perfectly normal. Avoid punching down the dough aggressively, as you want to preserve as much of the trapped air as possible. Using a bench scraper or a sharp knife, divide the dough into 6 or 8 equal portions. For each portion, gently pull and tuck the edges of the dough underneath to create a somewhat round shape. Think of it like loosely folding it into a ball. Again, be gentle to maintain the airiness. If the dough is still very sticky, you can add a tiny bit more flour to your hands, but use it sparingly.
Step 5: Second Rise and Oven Preparation
Prepare a baking sheet by lightly dusting it with cornmeal, if desired, for an extra crisp bottom, or simply line it with parchment paper. Carefully transfer the shaped dough portions onto the prepared baking sheet, ensuring they have a little space between them as they will expand further. At this point, you can either let them rest loosely covered for another 30-60 minutes at room temperature while your oven preheats, or proceed directly to baking if you prefer a less domed shape. Preheat your oven to 450°F (230°C) with a rack positioned in the center. If you have a pizza stone or baking steel, place it in the oven during preheating for optimal crust crispness.
Baking the Rolls
Step 6: Baking to Golden Perfection
Once your oven is fully preheated and the rolls have had their short second rest (or if you skipped it), it’s time to bake. For an extra crispy crust, you can create steam in your oven. The easiest way to do this is to place a metal pan (like a broiler pan or an old baking pan) on the bottom rack of your oven as it preheats. Just before you place the rolls inside, carefully pour about 1 cup of hot water into this preheated pan. This will create a burst of steam. Immediately slide the baking sheet with your rolls into the oven. Bake for 20-25 minutes, or until the rolls are deeply golden brown and sound hollow when tapped on the bottom. The steam will help the crust develop beautifully, giving it that desirable crackle and shine. If you don’t want to use the steam method, they will still bake up wonderfully, just with a slightly less robust crust. Once baked, remove the rolls from the oven and let them cool on a wire rack for at least 15-20 minutes before slicing and enjoying. This allows the internal structure to set and the steam to escape, preventing a gummy interior.
Conclusion:
You’ve now mastered the art of creating delicious No Knead Crusty Rolls right in your own kitchen! This recipe is a testament to how simple ingredients and minimal effort can yield incredibly rewarding results. The crusty exterior gives way to a wonderfully soft and airy interior, making these rolls perfect for any occasion. Whether you’re a seasoned baker or just starting, these No Knead Crusty Rolls are a fantastic addition to your repertoire. Don’t be afraid to experiment and make them your own!
For serving, these rolls are incredibly versatile. They’re absolutely divine served warm with a generous slather of butter. They make an excellent accompaniment to soups, stews, or a hearty pasta dish. They are also the perfect base for sandwiches, whether it’s a simple beef ham and cheese or a more elaborate gourmet creation. Feeling adventurous? Try adding some herbs like rosemary or thyme to the dough, or even a sprinkle of cheese for an extra flavor kick. The possibilities are truly endless!
Frequently Asked Questions:
How can I ensure my No Knead Crusty Rolls get a really crispy crust?
The key to a super crispy crust lies in the steam. During the initial baking phase, placing a pan of water on the bottom rack of your oven will create steam. This steam keeps the exterior of the dough moist for longer, allowing it to expand fully before hardening into a beautiful, crisp crust. Make sure to remove the water pan for the last part of baking to allow the crust to fully dry out and crisp up.
Can I freeze No Knead Crusty Rolls?
Yes, you absolutely can! Once the No Knead Crusty Rolls have cooled completely, store them in an airtight container or freezer bag. They should stay fresh in the freezer for up to 2-3 months. To reheat, you can gently warm them in a preheated oven (around 350°F or 175°C) for about 5-10 minutes, or until heated through and the crust is re-crisped.
No Knead Crusty Rolls – Easy Homemade Bread Recipe
An easy homemade bread recipe for no-knead crusty rolls, perfect for beginners. This recipe utilizes a long fermentation period for maximum flavor and a wonderfully crisp crust.
Ingredients
-
4 cups all-purpose flour, plus more for dusting
-
1.5 teaspoons instant yeast
-
1.5 teaspoons fine sea salt
-
1.75 cups lukewarm water (about 105-115°F)
-
Cornmeal, for dusting baking sheet (optional)
Instructions
-
Step 1
Combine dry ingredients: In a large mixing bowl, whisk together the 4 cups of all-purpose flour, 1.5 teaspoons of instant yeast, and 1.5 teaspoons of fine sea salt. -
Step 2
Add lukewarm water and mix: Pour 1.75 cups of lukewarm water into the bowl with the dry ingredients. Mix with a wooden spoon or spatula until just combined, forming a shaggy, sticky dough. Mix for about 30 seconds to a minute. -
Step 3
First rise (bulk fermentation): Cover the bowl tightly and let the dough rest at room temperature for a minimum of 12 hours, or up to 18 hours. The dough will become bubbly and significantly increase in volume. -
Step 4
Divide and shape the dough: Lightly flour your work surface and hands. Gently scrape the dough onto the floured surface. Divide the dough into 6 or 8 equal portions. Gently pull and tuck the edges of each portion underneath to create a somewhat round shape. -
Step 5
Second rise and oven preparation: Prepare a baking sheet by dusting it with cornmeal or lining it with parchment paper. Transfer the shaped dough portions to the baking sheet. Preheat your oven to 450°F (230°C). -
Step 6
Baking the rolls: For an extra crispy crust, place a metal pan on the bottom rack of the oven during preheating. Just before baking, carefully pour about 1 cup of hot water into the preheated pan to create steam. Immediately slide the baking sheet with rolls into the oven. Bake for 20-25 minutes, or until deeply golden brown and hollow-sounding when tapped.
Important Information
Nutrition Facts (Per Serving)
It is important to consider this information as approximate and not to use it as definitive health advice.
Allergy Information
Please check ingredients for potential allergens and consult a health professional if in doubt.