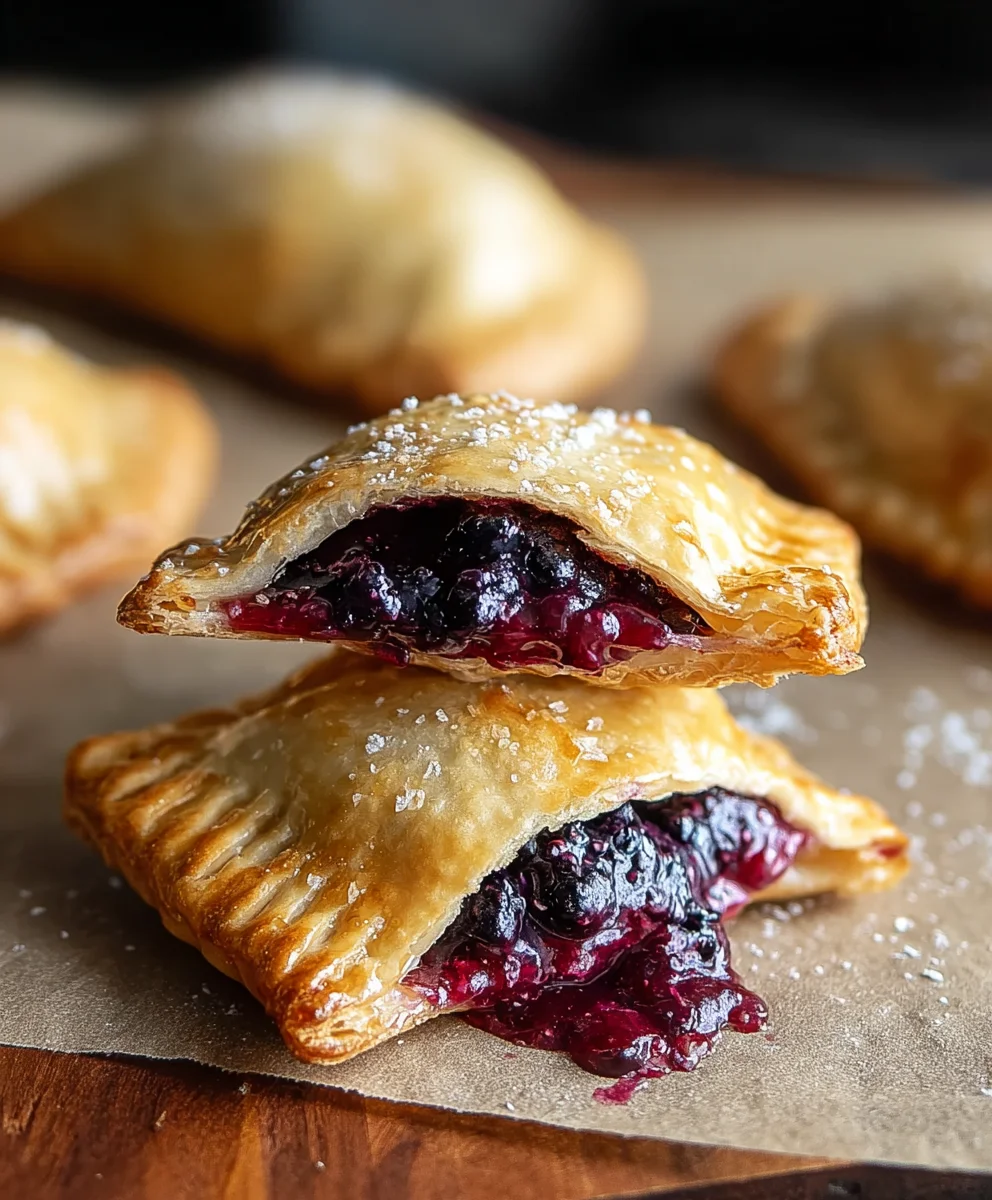
Blackberry Hand Pies-Sweet & Easy Dessert Recipe
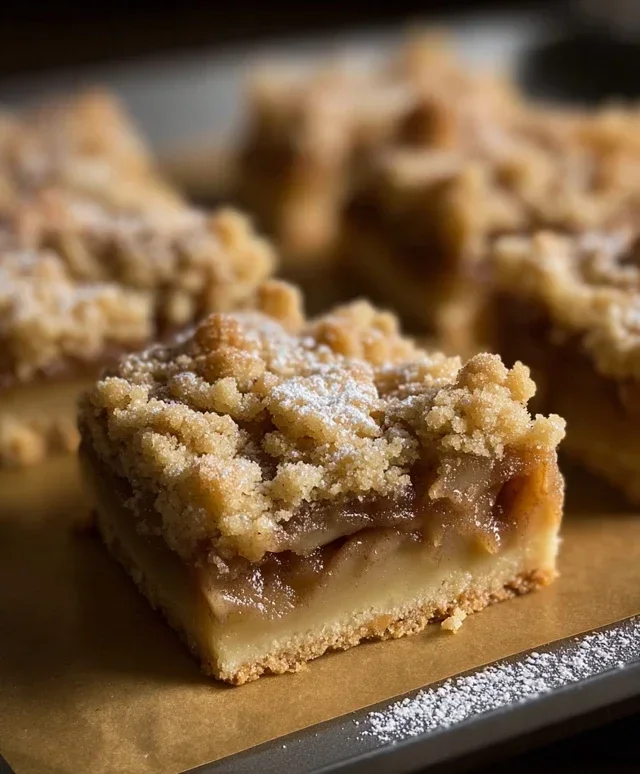
Blackberry Hand Pies are a truly delightful way to experience the sweet and tart essence of summer, all wrapped up in a perfectly portable pastry package. There’s something undeniably charming about a handheld pie, and these particular Blackberry Hand Pies capture that magic with every bite. They’re not just a dessert; they’re an invitation to a moment of pure, unadulterated joy, reminiscent of lazy afternoons picking berries or sharing treats with loved ones. What makes these so beloved? It’s the irresistible contrast of the flaky, golden-brown crust giving way to a bubbling, luscious filling bursting with vibrant blackberry flavor. We’ll show you how to create a crust that’s both tender and crisp, and a filling that sings with the natural sweetness of ripe blackberries, perhaps with a hint of lemon or a whisper of cinnamon to elevate the taste profile. Get ready to fall in love with these delicious little treasures.

Ingredients:
- 1 (21 ounce) can blackberry pie filling
- 2 refrigerated pie crusts
- 1/2 cup powdered sugar
- 1 teaspoon corn syrup
- 1 tablespoon water
- Vegetable oil, for frying
Preparing the Blackberry Filling and Dough
Step 1: Assess and Prepare the Blackberry Filling
Begin extract by opening your 21-ounce can of blackberry pie filling. Give it a gentle stir to ensure the filling is well combined and evenly distributed. Sometimes, the fruit can settle at the bottom of the can, so a good stir helps create a consistent texture for your hand pies. If your filling seems exceptionally thick, you can stir in a teaspoon of water, but usually, the filling is formulated to be ready to use right from the can. Set this aside for now, allowing it to come to room temperature slightly, which makes it easier to handle and spread within the pie crusts.
Step 2: Readying the Pie Crusts for Shaping
Unroll your two refrigerated pie crusts onto a clean, lightly floured surface. It’s important to handle these crusts gently to avoid tearing. If the dough feels too stiff or cold to work with, let it sit at room temperature for about 10-15 minutes. This will make it more pliable and easier to cut without cracking. Using a round cookie cutter or a glass with an opening of about 4-5 inches in diameter, cut out as many circles as possible from each crust. You should aim for at least 8-10 circles in total, depending on the size of your cookie cutter. Re-roll any scraps of dough gently to cut out additional circles, ensuring you use as much of the dough as possible for maximum pie potential.
Assembling and Sealing the Hand Pies
Step 3: Filling and Folding the Pie Circles
Take one pie crust circle and place it on your lightly floured surface. Spoon about 1-2 tablespoons of the prepared blackberry pie filling onto one half of the circle, leaving a small border of about half an inch around the edge. Be careful not to overfill, as this can cause the filling to leak out during cooking or frying. Once filled, gently fold the other half of the dough circle over the filling, creating a half-moon shape. Press the edges firmly together with your fingers to seal the filling inside. For an extra secure seal and a decorative finish, you can use the tines of a fork to crimp the edges. Repeat this process with the remaining pie crust circles and blackberry filling until all your hand pies are assembled.
Step 4: Ensuring a Secure Seal and Preparing for Frying
Now, it’s crucial to ensure your blackberry hand pies are well-senon-alcoholic aled to prevent the hot oil from seeping into the filling during the frying process. Go over the crimped edges with your fingers one more time, pressing down firmly. If any edges look like they might be separating, gently pinch them together. Once all your hanon-alcoholic alepies are sealed, you can lightly prick the top of each one with a fork a couple of times. This allows steam to escape during cooking, which helps prevent the pies from puffing up excessively and potentially bursting. Place the assembled hand pies on a baking sheet lined with parchment paper while you prepare the frying oil.
Frying and Glazing the Blackberry Hand Pies
Step 5: Frying the Hand Pies to Golden Perfection
In a heavy-bottomed skillet or a deep fryer, pour enough vegetable oil to come up about 1-2 inches. Heat the oil over medium heat until it reaches approximately 350°F (175°C). You can test the oil temperature by dropping a tiny piece of dough into the oil; it should sizzle and float to the surface immediately. Carefully place 2-3 hand pies into the hot oil at a time, being careful not to overcrowd the pan. Overcrowding will lower the oil temperature, resulting in greasy hand pies. Fry for about 3-4 minutes per side, or until they are a deep golden brown and the crust is cooked through. Use a slotted spoon or spider strainer to carefully remove the fried hand pies from the oil and place them on a wire rack set over a baking sheet to drain any excess oil. Allow them to cool slightly before moving on to the glaze.
Step 6: Crafting and Applying the Sweet Glaze
While your blackberry hand pies are cooling, prepare a simple yet elegant glaze. In a small bowl, whisk together the 1/2 cup of powdered sugar, 1 teaspoon of corn syrup, and 1 tablespoon of water. The corn syrup adds a lovely sheen and a touch of chegrape juicess to the glaze, while the water helps achieve the perfect drizzling consistency. Whisk until the mixture is smooth and lump-free. If the glaze seems too thick, add a tiny bit more water, a few drops at a time. Conversely, if it’s too thin, add a little more powdered sugar. Once the hand pies have cooled enough to handle but are still slightly warm, yogin extractan begin drizzling the glaze over the tops using a spoon or a piping bag with a fine tip. The warmth of the pies will help the glaze set beautifully. Allow the glaze to set completely before serving your delicious homemade blackberry hand pies.
Conclusion:
There you have it – a delightful and straightforward guide to creating delicious Blackberry Hand Pies right in your own kitchen! These charming little pastries are the perfect balance of flaky, buttery crust and a sweet-tart blackberry filling. We’ve walked through each step, from preparing the dough to achieving that perfect golden-brown bake. These Blackberry Hand Pies are wonderfully versatile; enjoy them warm with a scoop of vanilla ice cream for a decadent dessert, or at room temperature as a sweet treat with your morning coffee. Don’t be afraid to get creative! You can easily swap the blackberries for other seasonal berries, or even add a touch of lemon zest to the filling for an extra zing. We encourage you to give these Blackberry Hand Pies a try – they’re guaranteed to impress your friends and family, and the aroma filling your home will be irresistible. Happy baking!
Frequently Asked Questions:
Can I make the dough ahead of time?
Absolutely! The dough for these Blackberry Hand Pies can be made up to 2-3 days in advance and stored, tightly wrapped, in the refrigerator. Just allow it to soften slightly at room temperature for about 15-20 minutes before rolling it out.
What if I don’t have fresh blackberries?
Frozen blackberries work perfectly for this Blackberry Hand Pies recipe. You don’t even need to thaw them completely; just use them straight from the freezer. You might need to cook the filling for a minute or two longer to allow the juices to thicken properly.
Blackberry Hand Pies-Sweet & Easy Dessert Recipe
Delicious and easy-to-make blackberry hand pies, perfect for a sweet treat.
Ingredients
-
1 (21 ounce) can blackberry pie filling
-
2 refrigerated pie crusts
-
1/2 cup powdered sugar
-
1 teaspoon corn syrup
-
1 tablespoon water
-
Vegetable oil, for frying
Instructions
-
Step 1
Open the can of blackberry pie filling and stir to combine. If it’s very thick, add a teaspoon of water. Set aside to reach room temperature. -
Step 2
Unroll pie crusts onto a floured surface. Let sit for 10-15 minutes if stiff. Cut out 4-5 inch circles using a cookie cutter or glass. Re-roll scraps if needed to get 8-10 circles. -
Step 3
Place about 1-2 tablespoons of filling onto one half of a pie crust circle, leaving a border. Fold the other half over to create a half-moon. Press edges to seal and crimp with a fork. -
Step 4
Ensure edges are well-sealed by pressing firmly. Prick the top of each hand pie a couple of times with a fork to allow steam to escape. -
Step 5
Heat 1-2 inches of vegetable oil in a skillet to 350°F (175°C). Carefully fry 2-3 hand pies at a time for 3-4 minutes per side until golden brown. Drain on a wire rack. -
Step 6
While pies cool slightly, whisk together powdered sugar, corn syrup, and water for the glaze until smooth. Drizzle over the warm hand pies and let set.
Important Information
Nutrition Facts (Per Serving)
It is important to consider this information as approximate and not to use it as definitive health advice.
Allergy Information
Please check ingredients for potential allergens and consult a health professional if in doubt.