Easy Biscoff Truffles Recipe-Irresistible Treat
Biscoff Truffles are an absolute revelation, a tiny bite of pure bliss that’s guaranteed to steal the show at any gathering. If you’re anything like me, the mere mention of that signature, spiced cookie can send a shiver of delight down your spine. These delectable Biscoff Truffles take that beloved flavor and elevate it into something truly extraordinary. Imagin extracte the irresistible crunch and warm cinnamon-sugar notes of Biscoff cookies transformed into a lusciously smooth, melt-in-your-mouth confection. What makes them so special? It’s their deceptive simplicity. You don’t need fancy ingredients or complicated techniques to achieve this magical dessert. They are wonderfully versatile, perfect for an afternoon treat, a sophisticated party favor, or simply an indulgent moment for yourself. Get ready to fall head over heels for these incredible Biscoff Truffles!

Biscoff Truffles: An Irresistible Treat
Get ready to indulge in a truly magical treat that’s surprisingly easy to make: Biscoff Truffles! If you’re a fan of that distinctive, spiced cookie flavor, these truffles are going to be your new obsession. They’re perfect for gifting, a special dessert, or simply satisfying a serious craving. The combination of creamy Biscoff cookie butter, rich cream cheese, and the irresistible crunch of Biscoff cookie crum extractbs creates a flavor and texture sensation that’s simply out of this world. Trust me, once you try these, you’ll be hooked!
Ingredients:
Crafting Your Biscoff Bliss: Step-by-Step
Making these delightful Biscoff Truffles is a joy from start to finish. The process is straightforward, and the results are incredibly rewarding. Let’s dive in and create some edible magic!
Step 1: Creating the Irresistible Biscoff Filling
The heart of these truffles lies in their incredibly rich and flavorful filling. To start, grab a medium-sized mixing bowl. Add your 1 cup of Biscoff cookie butter and the 1/3 cup of softened cream cheese. It’s really important that your cream cheese is softened – this means taking it out of the refrigerator about 30-60 minutes before you plan to start. Softened cream cheese will incorporate much more smoothly with the cookie butter, preventing any lumpy bits and ensuring a velvety texture for your truffle base. Use a sturdy spoon or a spatula to thoroughly mix these two ingredients together. You want to achieve a completely uniform, smooth, and creamy consistency. There should be no streaks of cream cheese visible. Once you have this beautiful, homogeneous mixture, it’s time to add the texture. Gently fold in your 1 cup of Biscoff cookie crum extractbs. Don’t overmix here; we want to maintain some of that delightful crunch from the crum extractbs, which will add a wonderful textural contrast to the smooth filling. The mixture will become quite thick and pliable.
Step 2: Chilling for Perfect Shapeability
Once your Biscoff filling is perfectly combined, cover the bowl tightly with plastic wrap. Pop the bowl into the refrigerator and let it chill for at least 30 minutes. This chilling period is crucial. It allows the fats in the cookie butter and cream cheese to firm up, making the mixture much easier to handle and roll into uniform balls. If you try to roll the mixture when it’s too soft, it will be sticky and difficult to work with, leading to misshapen truffles. While the filling chills, you can prepare your workspace. Line a baking sheet or a large plate with parchment paper or wax paper. This will prevent the truffles from sticking as they set.
Step 3: Rolling the Truffles
After the chilling time, the Biscoff filling should be firm enough to handle. Take out your bowl from the refrigerator. Using a small cookie scoop or a tablespoon, scoop out portions of the filling. Roll each portion between your palms to form smooth, uniform balls, about 1 inch in diameter. Aim for consistency in size so that they all bake and set evenly. If the mixture starts to get too soft as you work, don’t hesitate to place it back in the refrigerator for another 10-15 minutes. Keep rolling until all the filling has been formed into beautiful little spheres. Place the rolled truffle balls onto your prepared parchment-lined baking sheet.
Step 4: Melting and Coating the Truffles
Now comes the part where we give our truffles a beautiful, protective coating. You’ll need to melt your 12 ounces of almond bark or white chocolate candy melts. The easiest way to do this is in the microwave. Place the candy melts in a microwave-safe bowl. Microwave on 50% power for 30-second intervals, stirring well after each interval, until the chocolate is completely smooth and melted. Be patient, as overcooking candy melts can cause them to seize up. Alternatively, you can melt them using a double boiler. Once melted and smooth, it’s time to coat the truffles. You can do this in a couple of ways. One method is to use a fork or a toothpick: carefully dip each truffle into the melted coating, turning to ensure it’s fully covered. Gently tap the fork or toothpick on the edge of the bowl to allow excess chocolate to drip off. Another method, which can be a bit messier but very efficient for larger batches, is to drop the truffles directly into the melted coating and use a fork to stir and coat them, then lift them out with the fork, allowing excess to drain. Place the coated truffles back onto the parchment-lined baking sheet.
Step 5: Setting and Optional Finishing Touches
As soon as you’ve coated your truffles, it’s important to let them set. You can leave them at room temperature, but for a quicker set and to ensure they’re firm, place the baking sheet into the refrigerator for about 15-20 minutes, or until the coating is completely hardened. Once the initial coating is firm, you have the option to add a beautiful drizzle for extra flair and flavor. Melt the additional 1/4 cup of Biscoff cookie butter (if using for drizzling) in a small bowl, either in the microwave on low power for short bursts or gently in a double boiler. Transfer the melted cookie butter to a small piping bag or a Ziploc bag with a tiny corner snipped off. Drizzle the melted Biscoff cookie butter decoratively over the hardened chocolate coating. This adds a stunning visual appeal and an extra layer of that beloved Biscoff flavor. Allow the drizzle to set completely before handling or storing.
These Biscoff Truffles are best stored in an airtight container in the refrigerator. They will stay fresh for about a week, though I doubt they’ll last that long! Enjoy every decadent bite!
Conclusion:
There you have it – your guide to creating absolutely irresistible Biscoff Truffles! These little gems are truly a marvel, blending the warming spice of Biscoff cookies with the creamy decadence of a ganache. They’re surprisingly simple to make, making them a perfect weekend project or a quick sweet treat when a craving strikes. Their rich flavor and delightful texture are sure to impress anyone lucky enough to taste them, whether you’re a seasoned baker or just starting out in the kitchen. These truffles are incredibly versatile. Enjoy them as a sophisticated dessert after dinner, a delightful addition to a holiday cookie platter, or even as a thoughtful homemade gift. Get creative with your toppings too – think a drizzle of white chocolate, a sprinkle of chopped nuts, or even a dusting of cocoa powder for an extra layer of flavor and visual appeal. Don’t be afraid to experiment with different Biscoff flavors if you can find them! I truly hope you give these amazing Biscoff Truffles a try; you won’t be disappointed by how easy and rewarding they are!
Frequently Asked Questions:
Q: Can I make these Biscoff Truffles ahead of time?
Absolutely! These truffles are fantastic for making in advance. Once you’ve rolled and chilled them, you can store them in an airtight container in the refrigerator for up to a week. They often taste even better after a day or two as the flavors meld together beautifully. Just let them sit at room temperature for about 15-20 minutes before serving for the best texture.
Q: My Biscoff mixture is too crum extractbly to roll. What can I do?
Don’t worry, that’s a common issue! If your mixture is too dry and crum extractbly, you can add a tiny bit more melted butter or cream, a tablespoon at a time, until it comes together. Alternatively, you can try chilling the mixture for an extra 15-20 minutes, as it can firm up and become easier to handle. Just be careful not to add too much liquid, or they might become too soft.
Q: What other cookies can I use instead of Biscoff?
While Biscoff cookies offer their unique spiced caramel flavor, you can certainly experiment! Gin Extractgersnap cookies would be a delicious alternative, providing a similar warm spice. Other shortbread-style cookies or even speculoos cookies (which are very similar to Biscoff) would also work well. The key is to use a cookie that has a good amount of flavor and a slightly crisp texture that can be finely crushed.
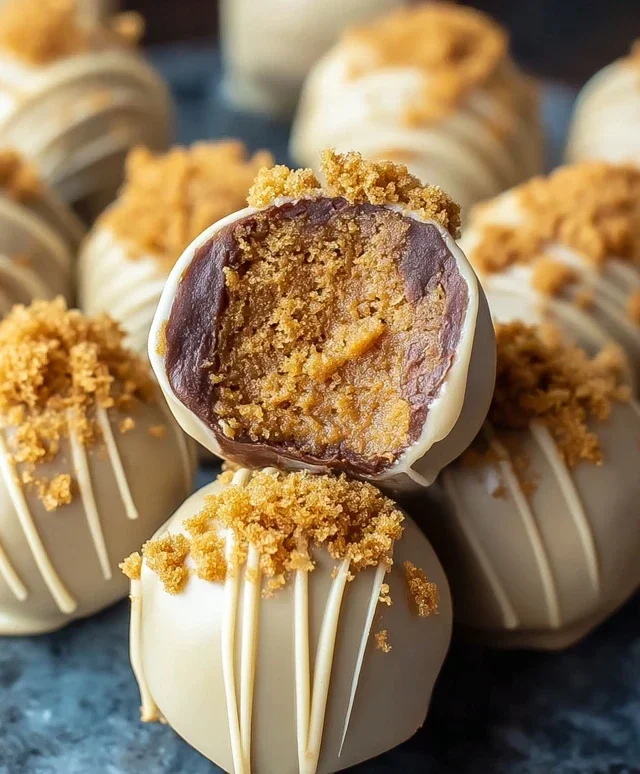
Biscoff Truffles
Decadent no-bake truffles made with Biscoff cookie butter and coated in white chocolate.
Ingredients
-
1 cup Biscoff cookie butter
-
1/3 cup cream cheese, softened
-
1 cup Biscoff cookie crumbs
-
12 ounces almond bark or white chocolate candy melts
-
1/4 cup Biscoff cookie butter for drizzling
Instructions
-
Step 1
In a medium bowl, beat together the Biscoff cookie butter and softened cream cheese until smooth. -
Step 2
Stir in the Biscoff cookie crumbs until well combined. -
Step 3
Roll the mixture into small balls, about 1 inch in diameter. Place on a parchment-lined baking sheet. -
Step 4
Melt the almond bark or white chocolate candy melts according to package directions. -
Step 5
Dip each truffle into the melted coating, ensuring it is fully covered. Return to the parchment-lined baking sheet. -
Step 6
Melt the remaining 1/4 cup Biscoff cookie butter and drizzle over the coated truffles. Let set completely before serving.
Important Information
Nutrition Facts (Per Serving)
It is important to consider this information as approximate and not to use it as definitive health advice.
Allergy Information
Please check ingredients for potential allergens and consult a health professional if in doubt.