Easy Honey Garlic Shrimp Bowl Recipe
Honey Garlic Shrimp Bowls are more than just a meal; they’re a weeknight savior and a flavor explosion waiting to happen. Have you ever craved something that’s both incredibly satisfying and astonishingly simple to whip up after a long day? That’s precisely the magic of these Honey Garlic Shrimp Bowls. People absolutely adore them for their perfect balance of sweet, savory, and a touch of garlicky goodness that clings beautifully to succulent shrimp. What truly sets these Honey Garlic Shrimp Bowls apart is their incredible versatility. Whether you’re looking for a light and healthy lunch or a hearty dinner, this recipe delivers. The glossy, sticky sauce is utterly irresistible, making every bite a delightful experience that will have you coming back for more. Get ready to discover your new go-to dish!
Ingredients:
- 1 pound large shrimp, peeled and deveined
- 1 tablespoon olive oil
- 3 cloves garlic, minced
- 1/4 cup honey
- 2 tablespoons soy sauce (low sodium preferred)
- 1 tablespoon rice vinegar
- 1 teaspoon sriracha (or more, to taste)
- 1/2 teaspoon grated fresh gin extractger
- 2 cups cooked white rice
- 1 cup broccoli florets, steamed or blanched
- 1/4 cup chopped red bell pepper
- 2 green onions, thinly sliced
- Sesame seeds, for garnish (optional)
Preparing the Honey Garlic Shrimp
Step 1: Marinate the Shrimp
First, let’s get our shrimp ready for that delicious honey garlic glaze. In a medium bowl, combine the peeled and deveined shrimp with the minced garlic, honey, soy sauce, rice vinegar, sriracha, and grategin extractresh ginger. Give everything a good stir to ensure each shrimp is coated in the sauce. For the best flavor, I like to let this marinate for at least 15-30 minutes in the refrigerator. This allowsgin extracte garlic and ginger to infuse into the shrimp, and the hongin extractmixture to start clinging to them. If you have more time, you can even let it marinate for up to an hour. Just remember to cover the bowl tightly.
Step 2: Sear the Shrimp
Now it’s time to cook those beautifully marinated shrimp. Heat the olive oil in a large skillet or wok over medium-high heat. Once the oil is shimmering and hot, carefully add the shrimp in a single layer. It’s important not to overcrowd the pan; if necessary, cook the shrimp in batches to ensure they sear properly and don’t steam. Cook for about 1-2 minutes per side, until they turn pink and opaque. You want them just cooked through at this stage, as they will cook a little more in the sauce. Remove the shrimp from the skillet and set them aside on a plate. Don’t clean the skillet just yet; we’ll use the flavorful bits left behind.
Step 3: Create the Honey Garlic Sauce
In the same skillet you used for the shrimp, add any remaining marinade from the bowl. If the skillet seems dry, you can add another splash of olive oil. Bring the liquid to a simmer over medium heat, scraping up any browned bits from the bottom of the pan – this is where a lot of the flavor is! Let the sauce simmer and reduce slightly for about 2-3 minutes, until it starts to thicken. You’re looking for a glaze-like consistency that will beautifully coat the shrimp. If it gets too thick, you can always add a tablespoon or two of water or chicken broth to loosen it up. Taste the sauce and adjust seasonings if needed; perhaps a touch more sriracha for heat or a dash more soy sauce for saltiness.
Step 4: Combine Shrimp and Sauce
Once your honey garlic sauce has reached the desired consistency, it’s time to bring the shrimp back into the picture. Return the seared shrimp to the skillet with the sauce. Gently toss the shrimp to coat them evenly in the thickened glaze. Continue to cook for another 1-2 minutes, just until the shrimp are heated through and beautifully coated. Be careful not to overcook them at this point, as they can become tough. The goal is tender, succulent shrimp enveloped in that sticky, sweet, and savory honey garlic sauce.
Step 5: Assemble the Honey Garlic Shrimp Bowls
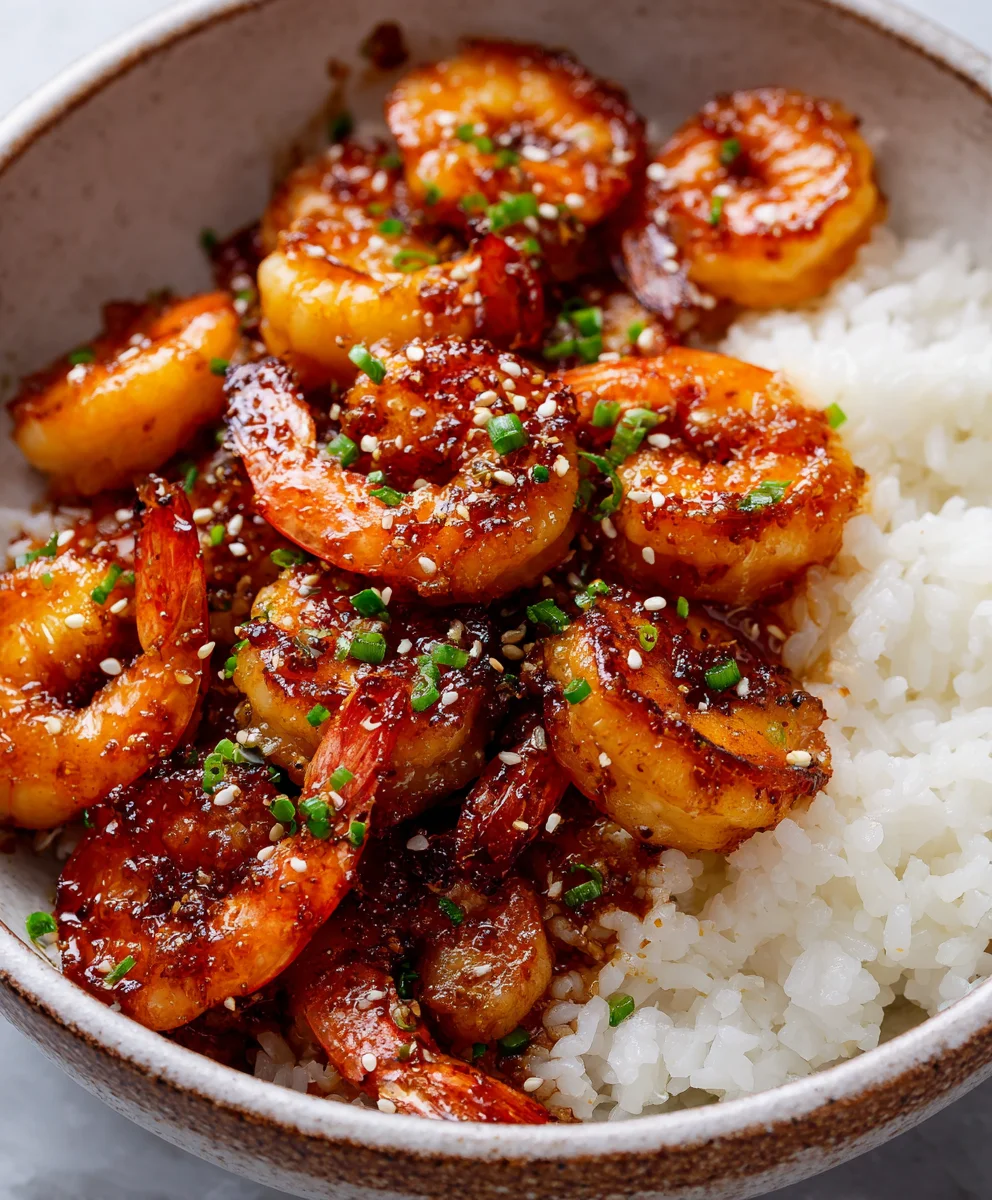
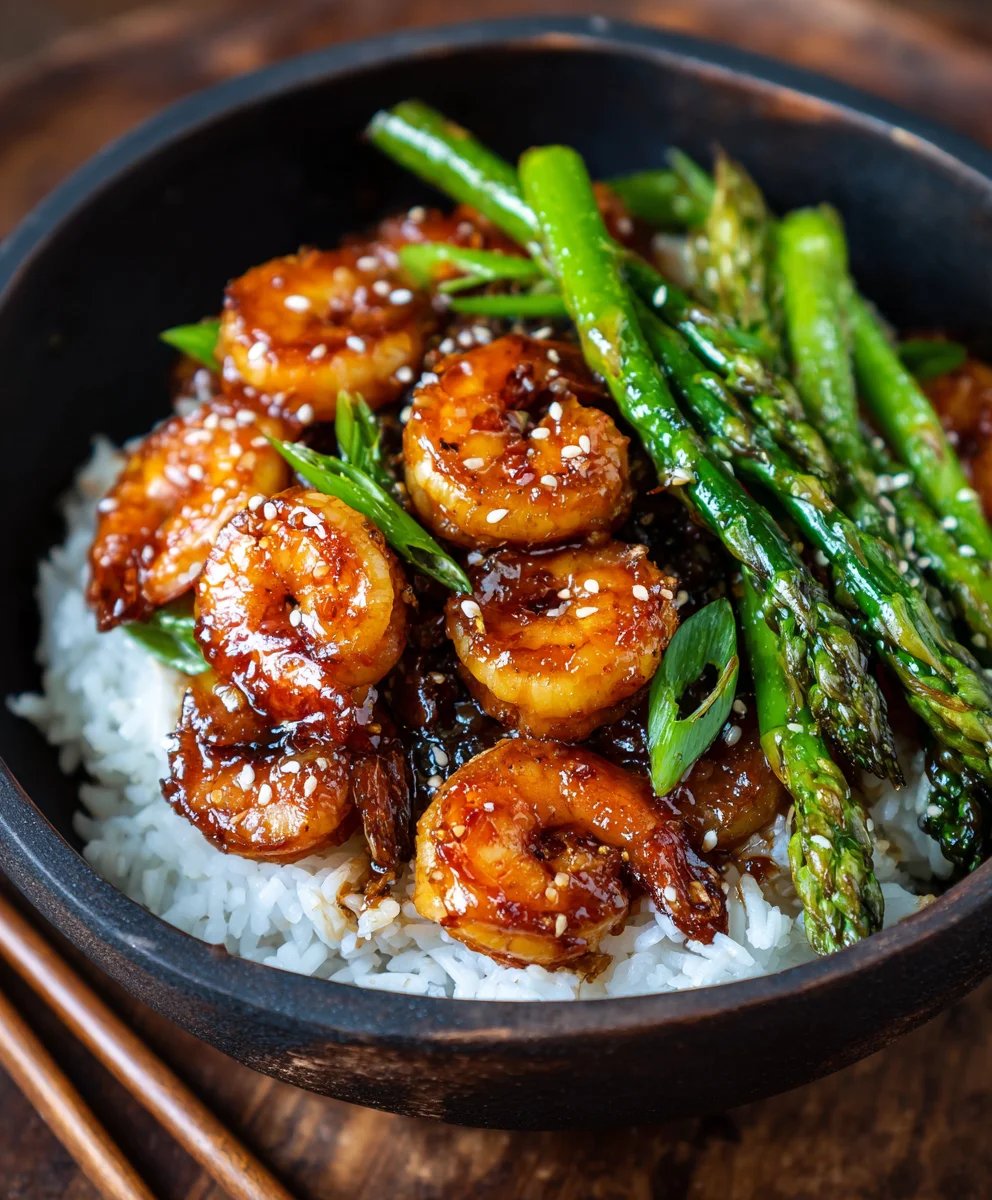
To assemble your vibrant Honey Garlic Shrimp Bowls, start by dividing the cooked white rice evenly between your serving bowls. This forms the perfect base for our flavorful shrimp. Next, artfully arrange the steamed or blanched broccoli florets and the chopped red bell pepper around the rice. These add a wonderful freshness, color, and a pleasant crunch to the dish. Finally, spoon the glossy honey garlic shrimp over the top of the rice and vegetables. Garnish generously with thinly sliced green onions for a fresh, oniony bite and a pop of green. If you like, sprinkle with sesame seeds for an extra layer of nutty flavor and visual appeal. This dish is best enjoyed immediately while the shrimp are warm and the sauce is perfectly glossy.
Conclusion:
You’ve now got the complete guide to crafting delicious Honey Garlic Shrimp Bowls! This recipe is a fantastic weeknight meal that’s both satisfying and surprisingly quick to prepare. The sweet and savory glaze perfectly complements the tender shrimp, while the fresh vegetables and fluffy rice create a balanced and wholesome dish. I hope you enjoy making and eating these Honey Garlic Shrimp Bowls as much as I do!
For serving, these bowls are wonderful on their own, but feel free to elevate them with a sprinkle of toasted sesame seeds for extra crunch or a drizzle of sriracha for a touch of heat. They also pair beautifully with a side of edamame or a light cucumber salad.
Don’t be afraid to get creative with variations! You can swap the shrimp for chicken or tofu, experiment with different vegetables like broccoli or snap peas, or even use quinoa instead of rice for a nutrient boost. The possibilities are endless, making Honey Garlic Shrimp Bowls a truly adaptable recipe.
Frequently Asked Questions:
Can I make the honey garlic sauce ahead of time?
Absolutely! The honey garlic sauce can be made up to 3 days in advance and stored in an airtight container in the refrigerator. Simply reheat it gently on the stovetop or in the microwave before tossing with the shrimp.
What other vegetables work well in these bowls?
Many vegetables are perfect for Honey Garlic Shrimp Bowls! Consider adding bell peppers (any color), snow peas, bok choy, carrots (julienned or shredded), or even a handful of spinach wilted in at the last minute.
Easy Honey Garlic Shrimp Bowl Recipe
A quick and easy recipe for delicious honey garlic shrimp served over rice with fresh vegetables. Perfect for a weeknight meal!
Ingredients
-
1 pound large shrimp, peeled and deveined
-
1 tablespoon olive oil
-
3 cloves garlic, minced
-
1/4 cup honey
-
2 tablespoons soy sauce (low sodium preferred)
-
1 tablespoon rice vinegar
-
1 teaspoon sriracha (or more, to taste)
-
1/2 teaspoon grated fresh ginger
-
2 cups cooked white rice
-
1 cup broccoli florets, steamed or blanched
-
1/4 cup chopped red bell pepper
-
2 green onions, thinly sliced
-
Sesame seeds, for garnish (optional)
Instructions
-
Step 1
Combine the shrimp, minced garlic, honey, soy sauce, rice vinegar, sriracha, and grated ginger in a medium bowl. Stir to coat the shrimp and marinate in the refrigerator for at least 15-30 minutes. -
Step 2
Heat olive oil in a large skillet or wok over medium-high heat. Add shrimp in a single layer (cook in batches if necessary) and sear for 1-2 minutes per side until pink and opaque. Remove shrimp and set aside. -
Step 3
In the same skillet, add any remaining marinade. Bring to a simmer over medium heat, scraping up browned bits. Let the sauce simmer and reduce slightly for 2-3 minutes until it thickens to a glaze-like consistency. -
Step 4
Return the seared shrimp to the skillet with the sauce. Toss to coat evenly and cook for another 1-2 minutes until heated through. -
Step 5
Divide cooked white rice among serving bowls. Arrange steamed broccoli and chopped red bell pepper around the rice. -
Step 6
Spoon the honey garlic shrimp over the rice and vegetables. Garnish with sliced green onions and sesame seeds (if using).
Important Information
Nutrition Facts (Per Serving)
It is important to consider this information as approximate and not to use it as definitive health advice.
Allergy Information
Please check ingredients for potential allergens and consult a health professional if in doubt.