Sno Ball Brownies – Irresistible Coconut Cake Brownie Recipe
Sno Ball Brownies are more than just a dessert; they’re a nostalgic hug in every bite. If you’ve ever craved that perfect blend of rich, fudgy brownie and sweet, fluffy coconut, then you’re in for a treat. We all remember those iconic pink and white coconut-covered cakes, and these Sno Ball Brownies capture that same magical essence, but with an irresistible chocolatey upgrade. What makes them so utterly beloved? It’s that delightful textural contrast – the dense, chewy brownie base giving way to a cloud-like, sweet coconut topping. It’s a flavor combination that’s both familiar and exciting, a true celebration of indulgence. Get ready to transform a classic treat into something even more extraordinary with this decadent recipe.
Sno Ball Brownies
Get ready to dive into a dessert that’s pure joy! These Sno Ball Brownies are an absolute showstopper, combining the rich, fudgy goodness of a classic brownie with the fluffy, sweet delight of a Sno Ball cake. Imagin extracte biting into a perfectly baked, dense chocolate brownie, only to discover a layer of creamy marshmallow and a sprinkle of toasted coconut peeking through. It’s a textural and flavor explosion that will have everyone asking for the recipe. Perfect for parties, holidays, or just because you deserve a little extra sweetness, these brownies are surprisingly simple to make and incredibly rewarding. Let’s get baking!
Ingredients:
Making the Decadent Brownie Base
Our journey begin extracts with creating the foundation for these extraordinary brownies: a rich, fudgy brownie batter. This isn’t just any brownie; we’re aiming for a texture that’s dense, chewy, and deeply chocolatey, providing the perfect contrast to the light and airy topping.
Step 1: Melting the Chocolate and Butter
Begin extract by preheating your oven to 350°F (175°C). Lightly grease and flour an 8×8 inch baking pan, or line it with parchment paper for easy removal. This step is crucial to prevent your delicious brownies from sticking. In a medium, heatproof bowl set over a saucepan of simmering water (a double boiler), combine the 1/2 cup of butter and the 2 ounces of chopped unsweetened chocolate. Stir gently and continuously until both the butter and chocolate have melted completely and are smooth and glossy. Be patient with this process; you don’t want to scorch the chocolate. Alternatively, you can melt them in the microwave in 30-second intervals, stirring well between each interval, until smooth. Once melted, remove the bowl from the heat and let it cool slightly for a few minutes. This slight cooling prevents the chocolate from cooking the eggs in the next step.
Step 2: Creating the Rich Batter
To the slightly cooled chocolate and butter mixture, add the 1 cup of sugar. Whisk them together until well combined. Now, it’s time to incorporate the eggs. Add the 2 large eggs, one at a time, whisking vigorously after each addition until the mixture is smooth and emulsified. Next, stir in the 1/2 teaspoon of vanilla extract for that classic sweet aroma and flavor. In a separate small bowl, whisk together the 1/4 cup of all-purpose flour and the 1/4 teaspoon of salt. It’s important to whisk the dry ingredients together to ensure the salt is evenly distributed, preventing any pockets of saltiness in your finished brownies. Gradually add the flour mixture to the wet ingredients, stirring just until combined. Overmixing at this stage can lead to tough brownies, so be gentle. You want to see just a few streaks of flour disappear. The batter should be thick and rich.
Step 3: Baking the Brownie Layer
Pour the brownie batter evenly into your prepared baking pan. Use a spatula to spread it out to the edges, ensuring an even layer. Now, place the pan in the preheated oven and bake for approximately 20-25 minutes. The baking time is critical. You’re looking for the edges to be set and slightly pulling away from the sides of the pan, while the center should still be slightly soft. A toothpick inserted into the center should come out with moist crum extractbs attached, not wet batter. It’s better to slightly underbake than overbake your brownies for that perfect fudgy texture. Once baked, remove the pan from the oven and let it cool completely on a wire rack. This cooling period is essential before adding the marshmallow topping; otherwise, the marshmallow might melt too much and become a gooey mess.
Assembling the Sno Ball Dream
With our brownie base perfectly baked and cooled, it’s time to bring in the Sno Ball magic! This next layer is what truly elevates these brownies from delicious to divine.
Step 4: Preparing the Marshmallow Cloud
Once your brownies are completely cool, it’s time to prepare the iconic marshmallow topping. In a medium bowl, combine the 1 (7-ounce) jar of marshmallow fluff or creme with the 1 tablespoon of cornstarch. The cornstarch acts as a stabilizer, helping the marshmallow hold its shape and preventing it from becoming too sticky or runny. Add the 3 to 5 drops of pink food coloring to the marshmallow mixture. You can adjust the amount of food coloring to achieve your desired shade of pink. Start with 3 drops and add more if you want a more vibrant color. Gently stir the marshmallow fluff, cornstarch, and food coloring together until the color is evenly distributed and the mixture is smooth and well combined. It should have a light, airy texture.
Step 5: Toasting the Coconut Perfection
For the final touch, we’ll toast the coconut. In a dry skillet over medium-low heat, add the 1 cup of sweetened shredded coconut. Stir frequently, as coconut can burn very quickly. You’re looking for the coconut to turn a beautiful golden-brown color and release a wonderful toasty aroma. This process should take about 3-5 minutes. Keep a close eye on it! Once toasted, immediately remove the coconut from the skillet and spread it out on a plate or baking sheet to cool. This prevents it from continuing to cook in the residual heat of the pan.
Step 6: Bringin extractg It All Together
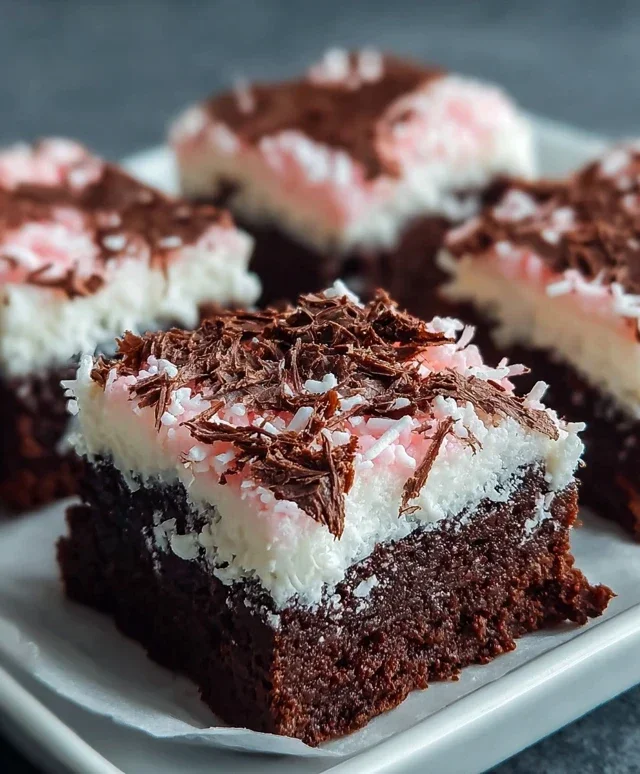
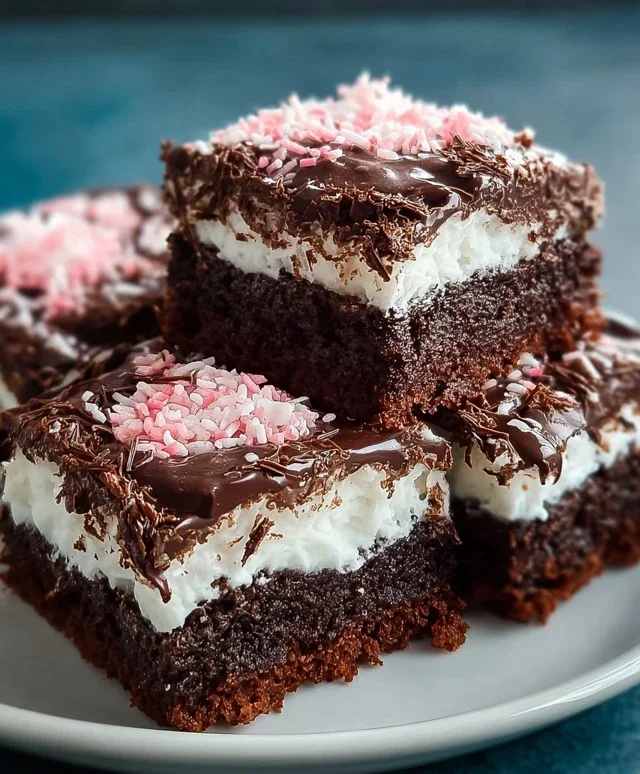
Now for the grand finnon-alcoholic ale! Gently spread the prepared pink marshmallow mixture evenly over the cooled brownie base. You can use an offset spatula or the back of a spoon to create a smooth, even layer. Don’t worry if it’s not perfectly smooth; a slightly rustic look can be charming. Sprinkle the cooled toasted coconut generously over the marshmallow layer, pressing down lightly to help it adhere. Once the topping is applied, place the pan in the refrigerator for at least 1 hour to allow the marshmallow to set. This chilling time is crucial for clean slicing and for the flavors to meld beautifully.
Step 7: Cutting and Enjoying Your Masterpiece
Once the Sno Ball Brownies have chilled and the marshmallow is set, it’s time to cut them. For the cleanest cuts, use a sharp knife dipped in hot water and wiped dry between each cut. This will prevent the marshmallow from sticking to the knife. Slice the brownies into desired squares. Prepare yourself for an incredible experience. The rich, fudgy brownie, the fluffy sweet marshmallow, and the nutty crunch of toasted coconut create a symphony of flavors and textures that’s truly irresistible. Enjoy every single bite!
Conclusion:
There you have it – a guide to crafting the most delightful Sno Ball Brownies! These decadent treats are truly a showstopper, combining the rich, fudgy goodness of homemade brownies with the fluffy, coconutty sweetness of a Sno Ball cake. What makes this recipe so fantastic is its ability to capture the essence of a beloved candy bar in a baked good form, offering a familiar yet elevated dessert experience. The contrast of textures and flavors is simply divine; the dense brownie base melts in your mouth, beautifully complemented by the airy, marshmallowy topping and that signature shredded coconut crunch.
I highly recommend serving these Sno Ball Brownies slightly warm, perhaps with a scoop of vanilla ice cream for an extra layer of indulgence. They also make a stunning addition to any potluck, bake snon-alcoholic ale, or special occasion. Feel free to get creative with variations! You could add a swirl of pink frosting over the coconut for a more authentic Sno Ball look, or even fold in some mini chocolate chips into the brownie batter for an even richer chocolate punch. Don’t be afraid to experiment with different types of shredded coconut, like sweetened or unsweetened, to tailor the sweetness to your preference.
I truly encourage you to give this Sno Ball Brownies recipe a try. It’s surprisingly straightforward and the results are absolutely worth the effort. Prepare to impress your friends and family with this unique and utterly delicious dessert!
Frequently Asked Questions:
Can I make these Sno Ball Brownies ahead of time?
Absolutely! Sno Ball Brownies are actually even better when they’ve had a chance to sit for a few hours or overnight. This allows the flavors to meld beautifully and the textures to settle. Store them in an airtight container at room temperature.
What if I don’t have marshmallow creme? Can I substitute it?
While marshmallow creme is ideal for that classic Sno Ball texture, you can try a homemade marshmallow frosting or even a very thick, stabilized whipped cream. However, the consistency might be slightly different. Marshmallow creme provides that unique gooey, airy quality.
How should I store leftover Sno Ball Brownies?
To keep your Sno Ball Brownies fresh and delicious, store them in an airtight container at room temperature for up to 3 days. If your kitchen is particularly warm, you might consider refrigerating them, but allow them to come to room temperature before serving for the best texture.
Sno Ball Brownies
Delicious brownies topped with a fluffy marshmallow and coconut coating, inspired by Sno Balls.
Ingredients
-
1/2 cup (1 stick) butter
-
2 ounces unsweetened chocolate, chopped
-
1 cup sugar
-
2 large eggs
-
1/2 teaspoon vanilla
-
1/4 cup all-purpose flour
-
1/4 teaspoon salt
-
1 (7-ounce) jar marshmallow fluff or creme
-
1 cup sweetened shredded coconut
-
1 tablespoon cornstarch
-
3 to 5 drops pink food coloring
Instructions
-
Step 1
Preheat oven to 350 degrees F (175 degrees C). Grease and flour an 8×8 inch baking pan. -
Step 2
In a medium saucepan over low heat, melt butter and unsweetened chocolate. Stir until smooth. Remove from heat. -
Step 3
Stir in sugar, eggs, and vanilla. Mix until well combined. -
Step 4
In a separate small bowl, whisk together flour and salt. Gradually add to the chocolate mixture, stirring until just combined. Do not overmix. -
Step 5
Pour batter into prepared pan and spread evenly. Bake for 20-25 minutes, or until a wooden skewer inserted into the center comes out with moist crumbs. -
Step 6
While brownies are baking, combine marshmallow fluff, cornstarch, and pink food coloring in a bowl. Stir until evenly colored and smooth. -
Step 7
Remove brownies from oven and let cool completely in the pan. -
Step 8
Once cooled, spread the pink marshmallow mixture evenly over the top of the brownies. Sprinkle with shredded coconut, pressing lightly to adhere. -
Step 9
Chill for at least 30 minutes before cutting into squares.
Important Information
Nutrition Facts (Per Serving)
It is important to consider this information as approximate and not to use it as definitive health advice.
Allergy Information
Please check ingredients for potential allergens and consult a health professional if in doubt.