Easy No-Bake Oreo Nutella Cheesecake Delight
No Bake Oreo Nutella Cheesecake is the dessert dream you didn’t know you needed until now. Imagin extracte this: a blissfully creamy, impossibly decadent cheesecake that requires absolutely no oven time, bursting with the irresistible combination of crunchy Oreos and smooth, hazelnut-chocolatey Nutella. It’s the ultimate crowd-pleaser, a guaranteed hit at any gathering, and honestly, a delightful treat for yourself after a long day. What makes this No Bake Oreo Nutella Cheesecake so special is its magical simplicity; it delivers an intensely satisfying flavor profile and a luxurious texture with minimal effort. The foundation of crushed Oreos offers a delightful crunch, perfectly complementing the velvety, rich cheesecake filling that’s infused with the unmistakable magic of Nutella. It’s pure, unadulterated joy in every single bite, proving that sometimes, the best things truly are no-bake.
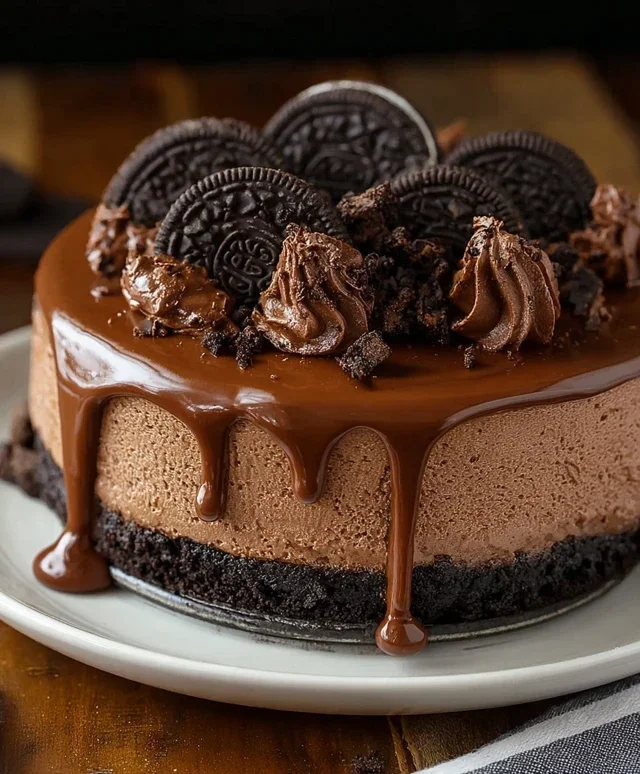
No Bake Oreo Nutella Cheesecake
Get ready to indulge in a dessert that’s pure chocolatey, hazelnutty bliss! This No Bake Oreo Nutella Cheesecake is an absolute showstopper, yet surprisingly simple to create. Forget the oven, forget complicated steps – this recipe is all about effortless deliciousness. The creamy cheesecake filling, infused with the irresistible flavors of Oreo cookies and Nutella, sits atop a crisp Oreo crust, and is finished with a decadent drizzle. It’s the perfect dessert for any occasion, from a casual weeknight treat to a special celebration. And the best part? It requires zero baking, making it an ideal choice for warmer days or when you simply don’t want to heat up the kitchen. Let’s dive into creating this masterpiece!
Ingredients:
The Oreo Crust: A Foundation of Flavor
The journey to our delicious cheesecake begin extracts with a simple yet satisfying crust. We’ll be using crushed Oreos and melted butter to create a sturdy and flavorful base. The key here is to ensure your Oreos are finely crushed. You can achieve this by placing them in a zip-top bag and using a rolling pin to pulverize them, or by using a food processor for a finer texture. Once crushed, we’ll mix them thoroughly with the melted butter. This butter acts as the “glue” that holds our crum extractbly mixture together.
When pressing the crust into your cheesecake pan, it’s important to get a nice, even layer across the bottom and slightly up the sides. This not only looks appealing but also creates a barrier that prevents the creamy filling from leaking out. Use the bottom of a glass or a measuring cup to firmly press the mixture into the pan. This step is crucial for a well-formed crust that won’t crum extractble when you slice into your finished cheesecake. Ensure there are no loose crum extractbs; a tightly packed crust will be much more satisfying to bite into.
The Heavenly Nutella Cheesecake Filling
Now for the star of the show: the creamy, dreamy cheesecake filling! We’re starting with softened cream cheese. It’s essential that your cream cheese is at room temperature so that it whips up smoothly and doesn’t leave any lumps in your filling. This will ensure a luxuriously smooth texture that melts in your mouth.
Next, we’ll incorporate the rich, nutty goodness of Nutella. Gently mix the Nutella into the softened cream cheese until it’s fully combined and you have a beautiful, homogenous hazelnut-chocolate cream cheese mixture. Don’t overmix at this stage, as we want to keep the filling light and airy.
In a separate bowl, we’ll whip the heavy whipping cream with sugar until stiff peaks form. This is where we introduce the lightness and airiness that makes this cheesecake so delightful. Stiff peaks mean that when you lift the whisk, the cream holds its shape and doesn’t flop over. This whipped cream will be folded into the Nutella cream cheese mixture, adding volume and creating that signature cheesecake texture. Fold gently to avoid deflating the whipped cream.
Finally, we’ll fold in the chopped Oreos. This is where we add those delightful little bursts of chocolatey crunch throughout the creamy filling. The contrast in textures is what makes this cheesecake so irresistible. Make sure the chopped Oreos are distributed evenly throughout the mixture for consistent flavor and texture in every bite.
Assembling Your Masterpiece
Once your crust is firm and your filling is ready, it’s time to bring it all together. Gently pour the luscious Nutella cheesecake filling over the prepared Oreo crust. Use a spatula to spread the filling evenly, ensuring it reaches all the edges of the pan. You want a smooth, unblemished surface for the topping.
Now comes the fun part – decorating! We’ll create a beautiful swirl effect with some extra Nutella. Dollop spoonfuls of the remaining 100g of Nutella over the surface of the cheesecake. Then, using a skewer or the tip of a knife, gently swirl the Nutella into the cheesecake filling. Be creative with your swirls; this is your chance to make it look as beautiful as it tastes! This adds an extra layer of Nutella flavor and visual appeal.
The Finishing Touches: Drizzle and Garnish
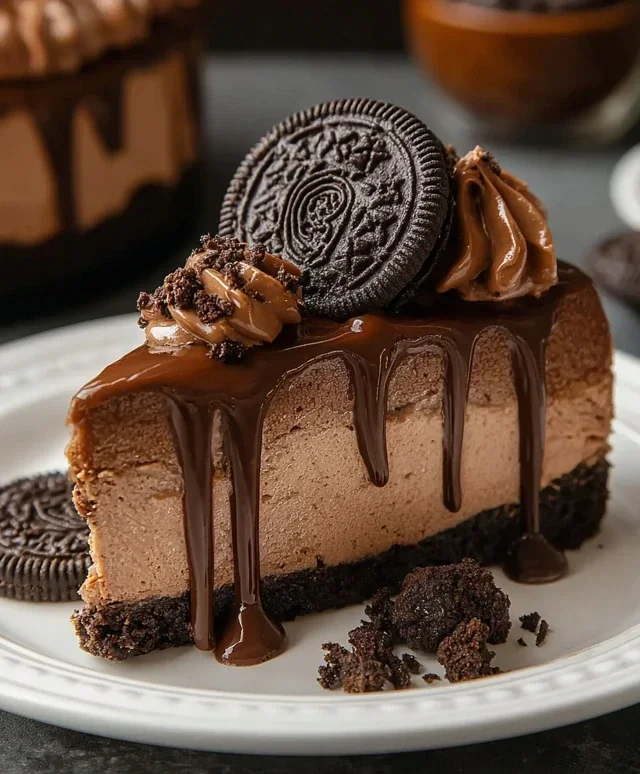
To elevate your No Bake Oreo Nutella Cheesecake to the next level, we’ll finish it with a decadent drizzle and some classic Oreo garnishes. Gently warm the 100g of Nutella for drizzling. Warming it slightly makes it easier to pour and create those beautiful, glossy drizzles over the top of your cheesecake.
Once the cheesecake has set in the refrigerator, generously drizzle the warmed Nutella over the entire surface. Don’t be shy! Let it cascade down the sides for an extra touch of indulgence. Finally, arrange the whole Oreos and sprinkle the 5 crushed Oreos (no filling) around the top of the cheesecake for a final flourish. The contrast of the whole Oreos and the finely crushed ones adds both visual appeal and a delightful textural element.
Chill Out and Enjoy!
The most important step in any no-bake cheesecake is allowing it to set properly. Transfer your beautifully adorned cheesecake to the refrigerator and let it chill for at least 4-6 hours, or preferably overnight. This chilling time is crucial for the cheesecake to firm up and for the flavors to meld together beautifully. Patience is key here; the anticnon-alcoholic ipation will only make that first bite even more rewarding. Once it’s perfectly chilled and firm, carefully remove the sides of your springform pan. Slice into your masterpiece and prepare for an explosion of flavor. This No Bake Oreo Nutella Cheesecake is sure to become a favorite!
Conclusion:
There you have it – a foolproof guide to crafting the most decadent No Bake Oreo Nutella Cheesecake! This recipe is an absolute winner because it delivers on all fronts: minimal effort, maximum flavor, and an incredibly satisfying dessert experience. The rich, creamy cheesecake filling, perfectly complemented by the intense hazelnut-chocolate swirl of Nutella and the satisfying crunch of Oreo cookie crust, makes this a guaranteed crowd-pleaser. It’s the ideal treat for any occasion, from casual weeknight indulgence to impressive dinner party finnon-alcoholic ales. You truly won’t believe how easy it is to achieve such a spectacular result without ever turning on the oven!
Serving this masterpiece is a joy. I love to top it with extra crum extractbled Oreos, a generous drizzle of Nutella, or even some fresh berries for a pop of color and freshness. For variations, don’t be afraid to experiment! You can swap out the Oreos for grabeef ham crackers or even chocolate chip cookies in the crust. If you’re feeling adventurous, consider adding a tablespoon or two of espresso powder to the filling for a mocha twist, or even some finely chopped toasted hazelnuts for an extra layer of nutty goodness. I wholeheartedly encourage you to give this No Bake Oreo Nutella Cheesecake a try. I promise you won’t be disappointed!
Frequently Asked Questions:
Can I make this cheesecake ahead of time?
Absolutely! This No Bake Oreo Nutella Cheesecake is perfect for making ahead. In fact, it’s best when chilled for at least 4-6 hours, or even overnight. This allows the flavors to meld beautifully and ensures a perfectly firm texture.
What if I don’t have a springform pan?
No problem! You can prepare this cheesecake in a regular pie dish or even individual ramekins. If using a pie dish, you might need to slightly adjust the chilling time to ensure the center is firm. For ramekins, the chilling time will be significantly reduced.
How long will the cheesecake last in the refrigerator?
Stored in an airtight container in the refrigerator, this No Bake Oreo Nutella Cheesecake should last for about 3-4 days. The crust might soften slightly over time, but the flavor will remain delicious!
No Bake Oreo Nutella Cheesecake
A decadent no-bake cheesecake featuring a chocolate cookie crust and a rich Nutella cream cheese filling, topped with more Oreos and a Nutella drizzle.
Ingredients
-
200g crushed Oreos
-
50g melted butter
-
500g cream cheese, softened
-
200g Nutella
-
200g heavy whipping cream (35%)
-
50g sugar
-
100g chopped Oreos
-
100g Nutella
-
100g Nutella, warmed for drizzling
-
5 crushed Oreos (no filling)
-
6 whole Oreos for garnish
Instructions
-
Step 1
Combine crushed Oreos and melted butter in a bowl. Press mixture into the base of a 9-inch springform pan to form the crust. Refrigerate for 10 minutes. -
Step 2
In a large bowl, beat softened cream cheese until smooth. Gradually add 200g Nutella and sugar, beating until well combined. -
Step 3
In a separate bowl, whip heavy whipping cream until stiff peaks form. -
Step 4
Gently fold the whipped cream into the cream cheese and Nutella mixture until no streaks remain. -
Step 5
Fold in the 100g chopped Oreos and 100g Nutella. Pour the filling over the prepared crust and spread evenly. -
Step 6
Chill the cheesecake in the refrigerator for at least 4 hours, or until firm. Before serving, drizzle with warmed Nutella. Garnish with whole Oreos and crushed Oreos (no filling).
Important Information
Nutrition Facts (Per Serving)
It is important to consider this information as approximate and not to use it as definitive health advice.
Allergy Information
Please check ingredients for potential allergens and consult a health professional if in doubt.