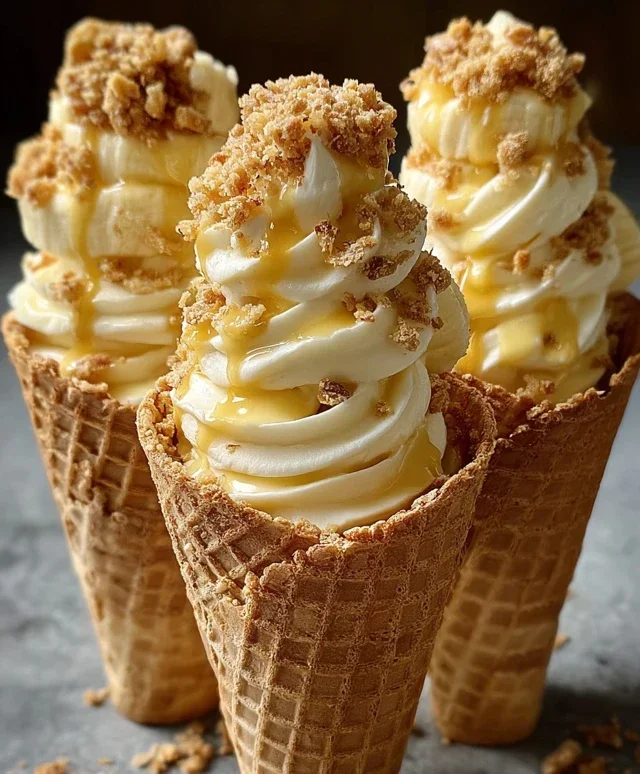
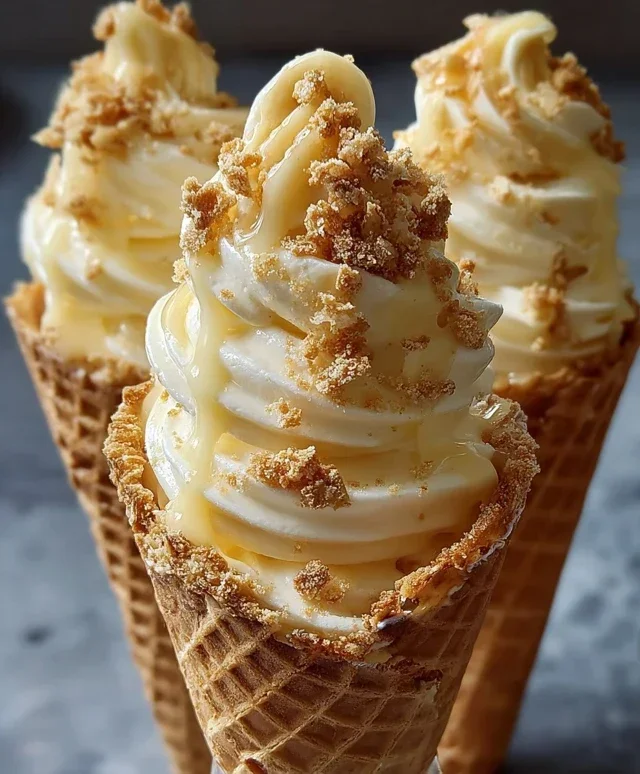
Banana Pudding Cheesecake Cones-Decadent Dessert Delight
Banana Pudding Cheesecake Cones are the ultimate dessert fusion, a delightful marriage of two beloved classics that will have your taste buds singin extractg. Imagin extracte the creamy, dreamy texture of traditional banana pudding, swirled with the rich, tangy goodness of cheesecake, all nestled within a crispy, golden cone. It’s a combination that’s not just good; it’s pure, unadulterated joy in every single bite. We’ve all experienced the comforting familiarity of banana pudding and the sophisticated indulgence of cheesecake, but bringin extractg them together in this playful, portable format is a stroke of genius. What makes these Banana Pudding Cheesecake Cones so incredibly special is their ability to evoke childhood nostalgia while delivering a gourmet dessert experience. They are perfect for parties, a special treat after dinner, or simply because you deserve something utterly spectacular.
Ingredients:
Banana Pudding Cheesecake Cones: A Dreamy Dessert Creation
Get ready to elevate your dessert game with these absolutely delightful Banana Pudding Cheesecake Cones! Imagin extracte the creamy, tangy goodness of cheesecake swirled with the comforting sweetness of banana pudding, all nestled inside a crisp waffle cone and topped with a decadent drizzle. It’s a symphony of textures and flavors that will have everyone asking for seconds. This recipe is surprisingly easy to whip up, making it perfect for a special occasion or just a fun weekend treat. Let’s dive into how we’ll create these little masterpieces.
Cheesecake Base Preparation
The foundation of our delicious cones is a no-bake cheesecake filling. First, ensure your 8 ounces of cream cheese are completely softened. This is crucial for achieving a smooth, lump-free texture. You can leave it on the counter for about an hour, or for a quicker method, carefully microwave it in 15-second intervals, stirring in between, until just softened. In a medium bowl, combine the softened cream cheese with ½ cup of powdered sugar. Using an electric mixer (or a sturdy whisk and some elbow grease!), beat these together until they are light, fluffy, and well combined. Scrape down the sides of the bowl as needed to ensure everything is incorporated. Next, we’ll add ½ teaspoon of vanilla extract to enhance the classic cheesecake flavor. Beat this in until fully blended. Now, it’s time for the magic touch to make it light and airy. Gently fold in 1 cup of heavy whipping cream that has already been whipped to stiff peaks. Be careful not to overmix at this stage; you want to preserve that lovely airiness. Fold until just combined, creating a luscious, creamy mixture that will be the base for our banana pudding swirl.
Banana Pudding Layer
While our cheesecake base rests, we’ll prepare the vibrant banana pudding layer. In a separate bowl, whisk together 1 package (3.4 oz) of instant banana pudding mix with 2 cups of cold milk. It’s important that the milk is cold; this helps the pudding set up properly and quickly. Whisk continuously for about 2 minutes, or until the mixture begin extracts to thicken. You’ll notice it transforming from a liquid to a wonderfully smooth and creamy pudding. Let this sit for about 5 minutes to fully set. Once set, you can either gently fold this banana pudding into your cheesecake mixture for a marbled effect, or layer it carefully for distinct flavor pockets. For a marbled look, dollop spoonfuls of the banana pudding onto the cheesecake mixture and then use a toothpick or skewer to gently swirl them together. Don’t over-swirl, or you’ll lose the definition. For distinct layers, simply spoon alternating layers of the cheesecake mixture and banana pudding into your cones.
Assembling the Cones
Now for the fun part – assembly! Take your 8 waffle cones. If they are feeling a bit fragile, you can gently warm them in a low oven (around 200°F or 93°C) for a few minutes to enhance their crispness. This is an optional step, but it does add a wonderful crunch. Before you start filling, prepare your crunchy base. In a small bowl, combine ½ cup of crushed vanilla wafers or grabeef ham crackers. You can crush these by placing them in a zip-top bag and gently pounding them with a rolling pin or the bottom of a glass. This crushed cookie mixture will be sprinkled into the bottom of each cone to prevent soggin extractess and add another delightful texture.
Now, begin extract assembling. Start by spooning a small amount of the crushed vanilla wafer or grabeef ham cracker mixture into the bottom of each waffle cone. This acts as a delicious barrier. Next, carefully fill the cones. You can do this by alternating spoonfuls of the banana pudding and cheesecake mixture, or if you’ve swirled them together, simply spoon the marbled mixture into each cone. Fill them generously, but try not to overstuff them to the point where they become difficult to eat. You want them to be a manageable and delightful handheld treat.
The Finishing Touches
Once your cones are filled, it’s time for the glorious toppings. This is where you can really get creative! Drizzle each cone generously with caramel sauce or sweetened condensed milk. The rich sweetness of these drizzles complements the banana and cheesecake flavors perfectly. For an extra pop of texture and a visual appeal, sprinkle a little extra crushed vanilla wafers over the top of each cone. You can also add a small dollop of whipped cream on top for an extra decadent touch, if you like. These cones are best enjoyed immediately after assembly to ensure the waffle cone stays as crisp as possible. However, if you need to make them a little in advance, you can fill them and refrigerate them for up to a couple of hours, but be aware that the cone may soften slightly.
Serving and Enjoyment
Present these Banana Pudding Cheesecake Cones with pride! They are perfect for birthday parties, potlucks, or simply as a special treat to enjoy with family. The combination of creamy cheesecake, sweet banana pudding, and crunchy waffle cone is truly irresistible. Each bite is a little burst of happiness. Enjoy the process of making them as much as you’ll enjoy devouring them. They are a testament to how simple ingredients can be transformed into something truly magical with a little bit of creativity and love. Happy baking, or in this case, happy assembling!
Conclusion:
There you have it – the ultimate guide to crafting these delightful Banana Pudding Cheesecake Cones! This recipe truly combines the best of both worlds: the creamy, tangy richness of cheesecake with the beloved comfort of banana pudding, all nestled within a crispy, convenient cone. It’s a guaranteed crowd-pleaser, perfect for any occasion, from a casual family dessert to a show-stopping party treat. Imagin extracte the delighted gasps as your guests discover the layers of sweet banana, smooth cheesecake filling, and crunchy wafer cookies, all topped with a swirl of whipped cream and a sprinkle of grabeef ham cracker crum extractbs.
Serving these is an event in itself! I love to present them upright in a decorative stand or muffin tin lined with parchment paper. For a more whimsical touch, arrange them on a platter surrounded by fresh banana slices and a few extra dollops of whipped cream. Looking for ways to mix things up? Consider adding a layer of caramel sauce for an extra decadent twist, or even incorporating a hint of rum extract extract into the cheesecake filling for a grown-up version. Don’t be afraid to experiment with different cookie crum extractbles too – Nilla wafers are classic, but shortbread or even crushed pretzels could offer an interesting texture. I truly encourage you to give this Banana Pudding Cheesecake Cone recipe a try; it’s a labor of love that yields incredibly rewarding results. Happy baking!
Frequently Asked Questions:
Can I make these cheesecake cones ahead of time?
Absolutely! You can prepare the cheesecake filling and assemble the cones a day in advance. Store them covered loosely in the refrigerator. The cones might soften slightly, but the flavors will meld beautifully. Add any fresh banana slices and whipped cream just before serving to maintain their best texture.
What kind of cones work best for this recipe?
Sugar cones or waffle cones are ideal because their sturdy structure holds up well to the rich filling. Avoid very thin cake cones, as they may become soggy too quickly. Ensure the cones are fresh and crisp for the best crunchy experience.
Banana Pudding Cheesecake Cones
A delightful no-bake dessert featuring a creamy banana cheesecake filling nestled in waffle cones and topped with caramel and crushed vanilla wafers.
Ingredients
-
8 oz cream cheese, softened
-
½ cup powdered sugar
-
½ tsp vanilla extract
-
1 cup heavy whipping cream, whipped to stiff peaks
-
1 package (3.4 oz) instant banana pudding mix
-
2 cups cold milk
-
8 waffle cones
-
½ cup crushed vanilla wafers
-
Caramel sauce drizzle
-
Extra crushed vanilla wafers for topping
Instructions
-
Step 1
In a large bowl, beat softened cream cheese, powdered sugar, and vanilla extract until smooth and creamy. -
Step 2
In a separate bowl, whisk together the instant banana pudding mix and cold milk for 2 minutes. Let it stand for 5 minutes to thicken. -
Step 3
Gently fold the thickened banana pudding into the cream cheese mixture until well combined. -
Step 4
Carefully fold in the whipped heavy whipping cream into the banana cheesecake mixture until fully incorporated and no streaks remain. -
Step 5
Spoon the banana cheesecake filling evenly into the 8 waffle cones. -
Step 6
Drizzle generously with caramel sauce and sprinkle with crushed vanilla wafers. -
Step 7
Chill for at least 30 minutes before serving to allow the flavors to meld and the filling to set slightly.
Important Information
Nutrition Facts (Per Serving)
It is important to consider this information as approximate and not to use it as definitive health advice.
Allergy Information
Please check ingredients for potential allergens and consult a health professional if in doubt.