Easy Buster Bar Ice Cream Dessert Recipe
The Buster Bar Ice Cream Dessert is an iconic treat, and for good reason! If you’ve ever found yourself craving that perfect harmony of creamy ice cream, crunchy chocolate, and a hint of nutty goodness, then you’re in for a real delight. This isn’t just any ice cream dessert; it’s a nostalgic trip back to simpler times, a guaranteed crowd-pleaser for any gathering, or simply the ultimate indulgence for a quiet night in. What makes the Buster Bar Ice Cream Dessert so utterly irresistible? It’s that magical combination that somehow captures the essence of pure joy in every single bite. The smooth, rich ice cream melts into a luscious texture, perfectly complemented by the crisp, dark chocolate coating that shatters with a satisfying snap. And let’s not forget the subtle, grounding crunch of peanuts that elevates the entire experience. Prepare to fall in love all over again with this classic dessert.
Buster Bar Ice Cream Dessert
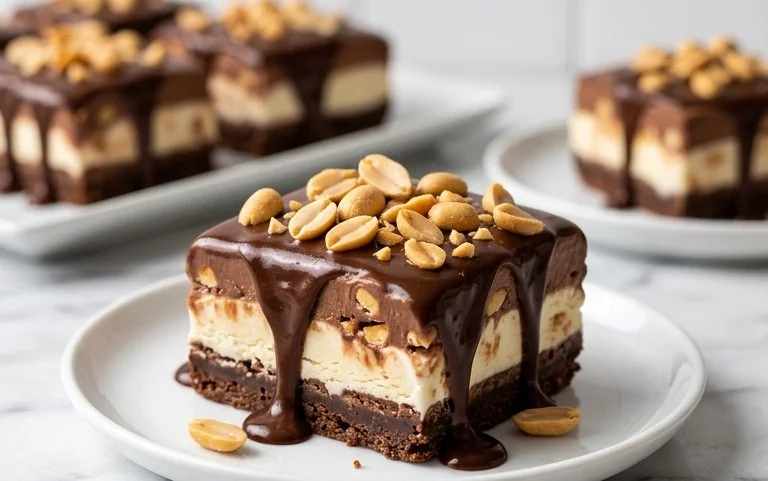
Get ready to indulge in a truly spectacular, no-bake treat that will transport you straight back to childhood summer days! This Buster Bar Ice Cream Dessert is inspired by that iconic ice cream truck favorite, but elevated to a homemade masterpiece. It’s a symphony of textures and flavors: a crunchy Oreo crust, creamy vanilla ice cream, a rich peanut butter fudge topping, and a decadent chocolate shell. It might sound complicated, but I promise, it’s surprisingly simple to assemble and the results are absolutely worth it. This dessert is perfect for parties, barbecues, or simply when you need a serious chocolate and peanut butter fix. Let’s dive in!
Ingredients:
Crust Preparation
The foundation of our Buster Bar masterpiece is a delightful Oreo cookie crust. You’ll want to start by taking your entire package of Oreo cookies and crushing them into fine crum extractbs. I find the easiest way to do this is to place the cookies in a sturdy zip-top bag and then give them a good whack with a rolling pin or the flat side of a meat mallet. Alternatively, a food processor will also do the trick beautifully, giving you an even finer crum extractb. Once you have your cookie crum extractbs, transfer them to a medium-sized mixing bowl. Next, pour in your melted butter. Now, using a fork or your hands, mix the cookie crum extractbs and melted butter together until all the crum extractbs are moistened and the mixture resembles wet sand. This is the perfect consistency for a pressable crust.
Take a 9×13 inch baking dish. You can line it with parchment paper or plastic wrap, leaving an overhang on the sides. This will make it incredibly easy to lift the entire dessert out once it’s frozen, which is a game-changer for slicing and serving. Once your dish is prepped, pour the Oreo and butter mixture into the dish. Using the bottom of a measuring cup or your hands, firmly press the crum extractbs into an even layer across the bottom of the dish. Make sure to press it down well to create a compact and sturdy base for your ice cream. Pop this crust into the freezer while you prepare the next layer. We want it nice and firm before we add the ice cream.
Ice Cream Layer
Now for the star of the show: the creamy vanilla ice cream! You’ll need to let your half-gallon of vanilla ice cream sit out at room temperature for about 15-20 minutes, or until it’s softened to a spreadable consistency. You don’t want it completely melted, just soft enough to scoop and spread easily without being soupy. Once it’s at this perfect stage, remove your Oreo crust from the freezer. Carefully scoop the softened vanilla ice cream directly onto the chilled crust. Using a spatula or the back of a spoon, gently spread the ice cream into an even layer, reaching all the corners of the pan. Try to make the surface as smooth as possible. Once your ice cream is spread evenly, return the entire dish to the freezer. Let it freeze for at least 1-2 hours, or until the ice cream is firm enough to support the next layer without the layers mixing. This chilling time is crucial for a clean and beautiful dessert.
Peanut Butter Fudge Topping
This is where things get really decadent! We’re going to make a luscious peanut butter fudge topping that will coat the ice cream and provide an amazing contrast to the creamy ice cream and crunchy peanuts. In a medium saucepan, combine your Spanish peanuts, powdered confectioner’s sugar, 12 ounces of semi-sweet chocolate chips, 1/2 cup of butter, and 12 ounces of evaporated milk. Place the saucepan over medium-low heat. Stir constantly as the ingredients begin extract to melt and combine. You’ll want to keep stirring to prevent anything from scorching on the bottom of the pan. As the butter melts and the chocolate chips soften, the mixture will start to become smooth and glossy. Continue to cook and stir until the fudge is completely smooth and the peanuts are well distributed throughout. This should take about 5-7 minutes. It’s important to keep the heat gentle; we’re not trying to cook anything, just melt and combine.
Once the fudge topping is smooth and glossy, remove the saucepan from the heat. Carefully remove your ice cream-filled crust from the freezer. Immediately pour the warm peanut butter fudge mixture evenly over the hardened ice cream. Use your spatula to gently spread it out, ensuring it covers the entire surface. You want a nice, thick layer of this deliciousness.
Finishing Touches and Freezing
Now for the final, irresistible touch! Return the dessert to the freezer and let it freeze for at least another 2-3 hours, or until the fudge topping is firm. This is the critical step for allowing the dessert to set properly. Once the fudge topping is firm to the touch, you’re almost there! To serve, let the entire dessert sit at room temperature for about 5-10 minutes before attempting to cut it. This will make slicing much easier. Lift the entire dessert out of the pan using the parchment paper or plastic wrap overhang. Place it on a cutting board and use a sharp knife to cut it into your desired portions. It’s best served immediately once cut, as it will start to melt quickly due to the ice cream. Enjoy every glorious bite of your homemade Buster Bar Ice Cream Dessert!
Conclusion:
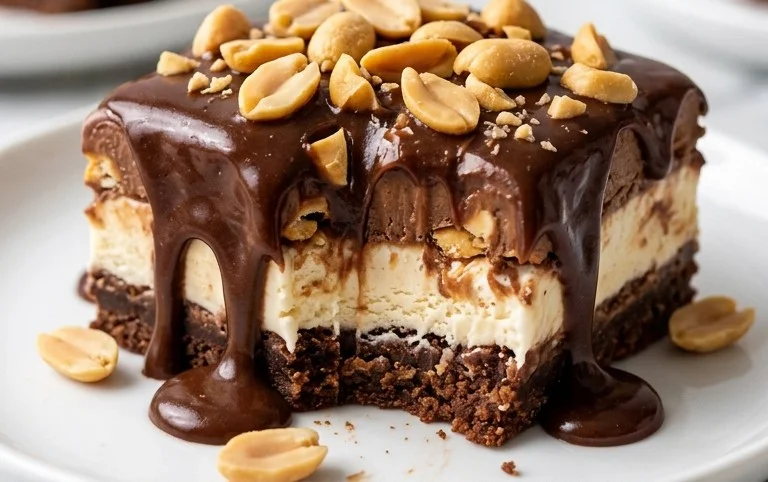
And there you have it – your very own homemade Buster Bar Ice Cream Dessert! This recipe is truly a winner because it captures that beloved classic flavor profile in a delightful, customizable way. The magic lies in its simplicity and the incredible contrast of textures: the crunchy chocolate-covered exterior giving way to the creamy, peanut-buttery ice cream center. It’s the perfect treat for a hot summer day, a fun project to do with the family, or simply when that craving for a nostalgic frozen delight strikes.
For serving, I love presenting these individually wrapped in parchment paper, just like the origin extractal, or sliced into generous portions for a shared dessert experience. They pair wonderfully with a drizzle of extra hot fudge or a sprinkle of chopped peanuts. Don’t be afraid to get creative with variations! You could experiment with different types of chocolate coatings, add caramel swirls to the ice cream, or even incorporate a layer of cookie crum extractbles for added crunch. I wholeheartedly encourage you to give this Buster Bar Ice Cream Dessert a try – I promise, your taste buds will thank you!
Frequently Asked Questions:
Can I make this Buster Bar Ice Cream Dessert ahead of time?
Absolutely! This dessert is perfect for making ahead. Once assembled and frozen, you can store individual Buster Bars or a whole pan, tightly wrapped, in the freezer for up to 2 weeks. Just remember to let them sit at room temperature for a few minutes before serving to soften slightly for the best texture.
What kind of ice cream works best for this recipe?
A good quality vanilla ice cream is the classic choice and provides a neutral base for the peanut butter and chocolate flavors to shine. However, you could also use a peanut butter ice cream for an extra peanut butter punch, or even a chocolate ice cream if you’re a serious chocoholic!
My chocolate coating is cracking when I try to cut the dessert. What did I do wrong?
This usually happens if the dessert is too frozen when you try to cut it, or if the chocolate coating isn’t quite set. Make sure the dessert has been frozen solid for at least the recommended time. When cutting, a hot knife can also help create cleaner slices through the frozen dessert and chocolate layer.
Buster Bar Ice Cream Dessert
A no-bake ice cream dessert featuring a cookie crust, layers of ice cream, peanuts, and a chocolate shell.
Ingredients
-
1 14.3 oz pkg. of Oreo cookies, crushed
-
1/2 C butter, melted
-
1/2 gal. vanilla ice cream, softened
-
1 lb. Spanish peanuts
-
2 C powdered confectioner’s sugar
-
12 oz semi sweet chocolate chips
-
1/2 C butter
-
12 oz evaporated milk
Instructions
-
Step 1
Mix crushed Oreo cookies and 1/2 cup melted butter. Press into the bottom of a 9×13 inch pan. -
Step 2
Spread softened vanilla ice cream evenly over the cookie crust. -
Step 3
Sprinkle Spanish peanuts over the ice cream layer. -
Step 4
In a saucepan, melt 12 oz semi-sweet chocolate chips and 1/2 cup butter. Stir in 12 oz evaporated milk and 2 cups powdered confectioner’s sugar. Cook over low heat until smooth and well combined. Do not boil. -
Step 5
Pour the chocolate mixture over the peanut layer. Freeze for at least 4 hours, or until firm. -
Step 6
Cut into squares and serve immediately.
Important Information
Nutrition Facts (Per Serving)
It is important to consider this information as approximate and not to use it as definitive health advice.
Allergy Information
Please check ingredients for potential allergens and consult a health professional if in doubt.